

So there it is, in all it's 723 piece glory.
According to Dictionary.com, "Discontinuity" means irregularity. Well, I had a little irregularity of a different kind while finishing this one. I was downright cross while making it. I promised a review on this one, so here it goes.
First, I would like to say that I don't like writing negative reviews, especially when people I like are involved (and I really liked the designer, Emily Cier). But, I know as a new-ish quilter, I make a lot of my decisions based on the thoughts and opinions of others and it is important to me to hear what they really think. I assume that goes for my readers. I sat down to start this review several times in the past month and opted to do housework instead, that is how much I was conflicted. I don't want to be thought of as someone who fires off a bunch of remarks, and then hides behind the computer. In delaying this review, I hope I can say what I want to say, but balance it with some good in addition to the not so good.
Pros:
- Cutting instructions are easy - you only cut one width of strips and then cut them down to smaller pieces
- NO Y-seams! The dreaded Y-seams are not a factor here.
- You learn a little about the "pixel-ated" approach that Emily applies to some of her designs. I can see the benefit of using this approach with other patterns.
- It is very easy to do all your cutting at once, all your piecing at once, then she recommends that you even press all seams at the very end
- Diagrams are wonderful, and easy to follow.
Cons:
- Lots of tiny pieces
- TIME - we spent about 2 hours in class cutting, then another 4 hours or so sewing our strips together. At the end of class I had 1/2 my crib top complete, it took me about another 4 hours to complete the 2nd half to have a completed crib top. I am a little slower than the average sewer.
- Lots of seams - I ended up just stitching in the ditch for the quilting. I kept thinking. "now what?" If I didn't have all those seams to deal with, I might have tried some fun FMQ designs. After all that SID, I was a little tired.
- wasted fabric - with each seam you lose 1/2 inch of fabric, right? There are 50 rows in this crib quilt. Granted you can't get rid of them all, but I would guess-timate about 1/4 yard of waste in the baby quilt size. That seems like a lot. And if I had made a bigger quilt...
I asked Emily the same question. I don't remember her exact words, but basically she had to make a choice. Either the cutting instructions where going to be really difficult to follow or there was going to be more sewing. Plus, I get it. She created this pixel-ated technique. It is only natural that she would want to incorporate it into her designs. She has an impressive pattern for the Mona Lisa using this technique. Well, I had a bunch of squares at the end of the day, not the Mona Lisa.
I really like Emily's patterns. I love the look of this one, and I really enjoyed making her "Groove" pattern during the Totally Groovy QAL. I was excited when I signed up for this class at the 2013 Road to California quilt show. I signed up for this class long before I actually made my Totally Groovy quilt. During the QAL, one of the other participants mentioned doing that pattern using a log cabin approach, which I used and was very happy to do so because it really let me get creative with the quilting. With all the seams in this one, I don't think I would have enjoyed the FMQ process much.
I had a hard time understanding what "a log cabin approach" was at the time, because I hadn't made many log cabin blocks. But after I saw some WIP pictures of other Totally Groovy participants work, I could picture it better. Turns out, I am making a second Discontinuity because Lizzy wants one too. So, I took a few pictures of the "log cabin approach" to give you an idea of what it means.
Emily's patterns have excellent diagrams for the piecing, complete with measurements. So she has done nearly all the work for you. You just need a tiny bit of additional math (even my mommy brain could do it) and make decisions of where you want to break up the pattern.
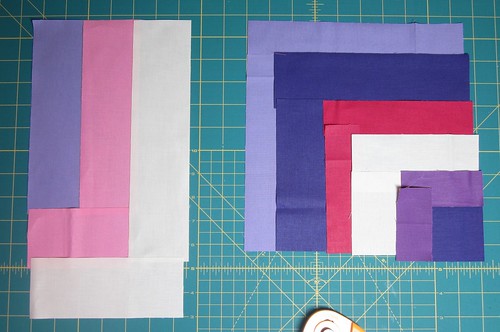
Instead of cutting one size strip, I cut 3 different widths of strips. Then I chopped them down to size using my diagram in the pattern. The picture above only shows 2 different widths, but you get the idea.
Then you start sewing them together just like you are making partial log cabins - you start at the "center block" and add strips around it.
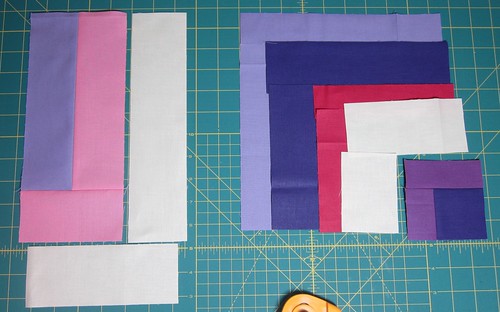
I like to work on 2 sections at time so I can do a bit of chain piecing. With this approach, I also pressed as I went along instead of all at the end. I like it this way because I have started pressing my seams open and it is easier to do as you go along.

Any way, you start building these partial log cabin sections, and then figure out a way that they will fit together best (a little planning ahead helps). See how the 4 pieces on the left will fit together nicely?
I like to cut as I go, just take one width of fabric strip at a time. I can already tell I am using a lot less fabric than the original pattern process, and any leftover pieces are going to be in sizes that are easier to use. Also, I set a timer while working and in 2.5 hours, I have just shy of half the crib top made already.
With the "Discontinuity" pattern, this approach is not completely perfect - although it did work wonderfully for the "Groove" pattern. Because of the rows, there are plenty of breaks in one direction of this pattern, but no one seam to split up the quilt in the other direction. Looking at the picture of my finished quilt above, I can see that I am going to have 3 areas where I am either going to have to do a y-seam or will have to split up one of my wider strips with an extra seam. I will probably opt for the later.
I hope by showing you this log cabin approach, it might make Emily's patterns more approachable. I think if this class/pattern had been advertised, "Make a baby quilt with 723 pieces", I probably wouldn't have signed up. However, I don't think this is the last of her patterns that I will try out now that I am comfortable enough to not follow the directions.
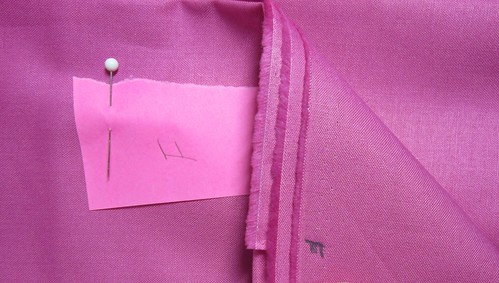
One last tip! Regardless of the method used, staying organized is just as important with this patterns as any other. I labeled each of the 9 colors of fabric I used, both by pinning a sticky to it, and by marking the selvage of the color with the corresponding letter.
I also found these little accordion file organizers in the dollar section of Target.
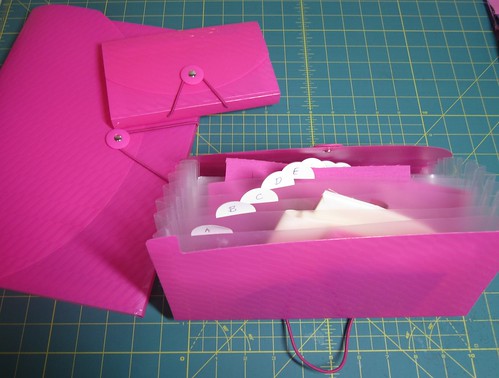
I place my strips in one of their labeled sections, that way I don't have to have them all laid out on the table. Also makes for easy clean up when I have to put everything away for the day because the kids are coming home.
They come in 3 different sizes. I like to use the big ones for my printouts of various patterns and templates, etc. The two smaller ones are great for storing fabric you have cut for blocks.
I hope this review helps someone out there. Stay tuned for the 2nd version.
Thanks for reading,
Jen
Gorgeous quilt, and excellent review Jen!
ReplyDeleteThanks for your honestly! I have my Groove basted, and did the strip method, not the log cabin-style, but I can see with this one, the log cabin would definitely be preferable. Great review. :-)
ReplyDelete