Monday, September 30, 2013

September progress report and October goal setting

I have felt behind this month since it started.  But looking at my list, it looks like I got most of what I hoped to finish completed.  October is already proving to be a difficult month.  It seems like every email and phone call I receive is adding one more thing to the calendar.  I guess I will really have to focus on my tasks instead of just working on what I want to like the free spirit I was in early September.

September UFO's:
  • Summerville DP blocks - My Lazy Bum secret partner chose this as my project for September's UFO challenge.  I am happy to report that they went from these plain Drunkard's Path blocksSummersville DP to 2 table toppers and a potholder.  I literally finished them up this morning, the last day of the month!
  • Summerville DP table topper 2
  • Swoon - I wanted to get 6 more blocks done. Well I fell a little short, I only got 4 done.
September NewFO's
  • Commission quilt - I've took on a commission quilt for a friend and hoped to get the top completed and I did! I now need to piece the backing and get it basted and quilted. commission quilt WIP 
  • 60 degree ruler mini quilt - I finished my candy corn table runner.  The tutorial is HERE.
  • Candy corn table runner closer

Now for October

October UFO's:

  • Handstitched Medallion - My Lazy Bums group has decided that this month's challenge item should be blue or aqua.  I have several quilts on my UFO list that would fall into this category, but I decided to take a little liberty and choose the one I most want done before Christmas, my Handstitched Medallion quilt.  It has a little blue and some aqua, and I hope that the group won't consider me a cheat for choosing it.  Honestly, it has a lot of work left to be done, and other than attaching the binding, all of it is handwork and time consuming.
  • Medallion Quilt top
  • Swoon -since I didn't finish up the blocks in September, I hope to finish them up and get to the flimsy stage this month.
  • Commission quilt - get it backed and at least basted.

October NewFO's
  • Wicked Blog Hop - I seriously have a problem signing up for things.  I actually tend to binge-commit.  I say no to half a dozen things, then all of sudden I feel like I must reward myself by saying Yes to something and I may continue and go a little crazy. (I buy fabric the same way.) I signed up for the Wicked Blog Hop at the end of the month, so I will be creating something with a Halloween theme to it.
  • Pattern testing quilt for a dear friend
  • Sewing mat for another dear friend
  • One Block Wonder QAL quilt - I almost forgot to add this one!  I can't host a QAL without making one myself, right?

Wow, that's a lot!  Wish me luck this month, looks like I will need it.

Thanks for reading today as I list myself into a frenzy,

Jen

Linking up with:
My Button

2013NewFO

Sunday, September 29, 2013

Inspirational Sunday 7 - via the 2013 International Quilt Festival in Long Beach

OK!  So I've shown lots of great art quilts and some modern quilts so far in this series.  I think today would be a good day to go more traditional, specifically applique.  There were so many downright gorgeous applique quilts at the show; it is difficult to decide which ones I want to show you first.  Ah, what the heck, I will start with the show stoppers!

This one is called "Flowers in My Heart" by Noriko Kido of Azumino, Nagano, Japan.  It won first place in the traditional applique category.

"Flowers in My Heart" by Noriko Kido of Nagano, Japan


It is hand and machine pieced, hand appliqued, hand embroidered, hand quilted, and trapunto.  The quilter says, "I love old quilts like those designed by Marie Webster.  Inspired by these classics, I created my own pattern, combining flowers with a Dresden Plate."

"Flowers in My Heart" by Noriko Kido, close up


I just love the little yellow dots surrounding the plates, the flower buds created with the partial plates, and the hand quilting is just amazing!

This next one, literally stopped me in my tracks.  It had a crowd of people around it and I had to wait nearly 15 minutes for a lull in the crowd so I could snap a picture of it.  It is called "ElaTED" by Ted Storm from S-Gravenzande, Netherlands.  It won the "Founders Award" in Traditional Applique.

"ElaTED" by Ted Storm of the Netherlands


It is hand appliqued, padded appliqued, embroidered, beaded, padded trapunto, and hand quilted.  Inspired by Delftware.  The quilter says, "To challenge myself, I started with my least favorite color and fabric: brown and plaid.  From there, I took off, inspired by Delftware elements.  It was fun to create eight different asymmetrical designs in a symmetrical setting."

The hand quilting on this one is spectacular too!

ElaTED by Ted Storm, detail 2


ElaTED by Ted Storm detail 1


I think the brown plaid really fits the design.  The results are gorgeous, no?  When was the last time you challenged yourself to work with your least favorite color and fabric?

I have plenty more applique to show you in the future.

Thanks for reading today,


Jen


Thursday, September 26, 2013

Kick off! - One Block Wonder Quilt Along

Welcome to the kick off of the One Block Wonder Quilt Along!  I hope you have had a chance to gather your supplies and start thinking about what kind of quilt you might like to create.

OBW

Before we get to the mini-interview, I would like to mention a few things.
  • First, there is still plenty of time to join in.  Just join the Flickr group and gather the supplies.
  • Time - a couple people have looked at the schedule and worried that there wouldn't be enough time to complete a top by the end of October.  Let me reassure you, there is!  
    • We are using one fabric
    • cutting 6 pieces with each slice of the rotary cutter makes for extremely efficient cutting time
    • all straight line piecing (no Y seams)
    • the longest part of the process is deciding how to group and arrange your hexagons
    • You only have to finish a top and there is no size requirement to link up to the QAL
  • This QAL is very beginner friendly because of all the reasons listed above!

Blue OBW at park
Now......

A mini-interview with Maxine Rosenthal, co-author of the One Block Wonders books.

When and how did you start quilting?

I started quilting when Penny McMorris was on Public TV. She was sewing on a featherweight machine and it didn't look too hard. That was in the mid 80's. Besides I wanted a quilt. I also joined a local quilt guild, which gave me much inspiration and instruction.  


How did you meet Ms. Pelzmann?

I met Joy in a quilting class at Minnesota Quilters, our state guild. She asked if I made my quilts using a computer. She was shocked to find that I just did it on the fly, designing on a wall, then sewing it together.


How did the two of you come up with the idea of the One Block Wonders technique?

I came up with the idea of the One Block Wonder technique because though I loved kaleidoscopes, they always looked like a bulls-eye on a background and I wanted to eliminate the background. When I began doing these, I called them Kaleidoscopic Watercolor.


I know where the summer goes by Cathie Ugrin
"I know where the summer goes" by Cathie Ugrin at the 2012 International Quilt Festival in Long Beach

Just about every major quilt show I attend has an example of your OBW technique.  Do you have a favorite one that you have seen in exhibition and what was the original fabric like?

I love all the quilts that I see at exhibits. It makes my heart sing to know that people are using this technique and producing such fantastic ART!!!  These quilts follow my mantra - they should look hard and yet be easy.


What is the biggest tip you can give with regard to the stacking and cutting process?

The biggest tip I can give anyone is to have fun. These quilts have so much going on that it hides inaccuracies well.  Precision is elusive, I do though, aim for accuracy, but it is only an aim.


When I made my quilt, I found the seams a little bulky where the triangles met to form hexagons, do you have any tips for getting them to lie a little flatter?

Be sure to press all your seams open, even when sewing the long columns together. That will distribute the bulk the best.


I ended up just doing a simple stipple for my quilting design, do you have any other quilting recommendations?

All your work has gone into the quilt top and its design. You do not want the quilting to outshine this gorgeous design. You are so right, the simplest quilting is the best.


To you travel and teach your technique?

I have traveled all around the states giving lectures and classes. I always tell my daughter that people actually pay to hear me talk. A little fact that our children need to know.


Your One Block Wonders book was published a while ago, what have you been working on since, and do you have anything new to share with my readers?

My favorite is Escher. I tried to incorporate his ideas of impossible structures in the third book. Now that I am a grandmother, I am making more baby quilts. I consider these the very best 'I Spy' quilts, where I use the original fabric as the border so that he can find where each kaleidoscope comes from. I am still fascinated to see what each different piece of fabric will produce.


How does it make you feel that your OBW technique is still getting attention?

I am thrilled to find that the OBW technique is still being used and in quilt shows around the country. C&T has put out a new calendar with one of my quilts on the cover!!!! 


Thank you for asking me to be a part of your blog/quilt along.


And thank you, Maxine, for joining us today for our kick off post!

I just love Maxine's mantra of creating quilts that look hard and yet are easy.  I also like her idea using this technique with a novelty fabric to create I Spy quilts for her grandchildren.

There is also another Flickr Group devoted to OBW quilts, in case you need some additional inspiration.  I will see you back here next Thursday for a ridiculously long post about fabric selection tips.

If you have any questions about the quilt along, or even some you would like me to pass along to Maxine, please leave them in the comments below.

Thanks for reading,

Jen

Tuesday, September 24, 2013

Seeing Spots - Building Blocks Tuesday

This week I knocked off my blocks for the Simply Solids Bee, and it had me seeing spots.

Simply Solids September

Meli asked us to make these circles in warm/cool colors.  The tutorial is found HERE at Bijou Lovely.   They were super easy to make and I think would make a darling quilt if you fussy cut the circles from an interesting print.

What have you been working on this week?  I would love to see.  Link up your fabulous blocks.  You put a lot of hard work into them - show them off!  This free linky will stay open for a whole week.


Quilter in the Closet

Rules:

1) Please link up only to the page in your blog showing your wonderful blocks, not just the blog homepage.  Flickr pictures are also OK.
2) Make sure to put your blog name as the description so people know where they are going or the name of your block!
3) Please grab my button and post it in your blog post or sidebar.
4) Visit other linky participants!

I hope you will join me on Thursday as we kick off the One Block Wonder QAL with a mini-interview with Maxine Rosenthal, co-author of the One Block Wonder books.

Thanks for reading!

Jen


Sunday, September 22, 2013

Inspirational Sunday 6 - via the 2013 International Quilt Festival in Long Beach

I am sorry I missed last week.  I thought I would be able to post while on my mini-vacation, but I ran into difficulties.

This week's quilts have a modern flair.  I've been noticing a lot more modern quilts in the shows the last year or two.  I really enjoy looking at them.  While some are more simplistic in design, not all are simply made.

Also, I observe that often at shows, there is a themed exhibit and you get to see how quilters take that theme and come up with completely different ideas and quilts while interpreting that theme.  The opposite is also true as you walk around the show - some quilters take completely different inspiration and construction methods, yet come up with remarkably similar looking quilts.  Here are a few examples of that today.

The first quilt is called Wall Markings #2 by Valerie Maser-Flanagan of Carlisle Massachusetts.

"Wall Markings #2" by Valerie Maser-Flanagan of Carlisle, MA


It is machine pieced and machine quilted.  It was inspired by worn brick walls!  The quilter says, "I love the beauty of worn brick walls that have experienced layers of paint, mold, and partial crumbling.  On my first visit to Mass MOMO I was more influenced by the brick walls inside the building than by the art on display.  My approach is improvisational.  I begin with a general idea, a palette of colors and a blank wall.  I fined this approach intriguing because the interaction of line, shape and color cause unexpected results."

I love how quilts can be inspired by the unlikeliest places or things.  I also appreciate her advice of starting with an idea and a color palette and seeing where it takes you.


The second quilt is similar in some ways.  It is called Colorstrips #1 by Lynda Faires of Louisville, Colorado.  It won first place in the Art-Abstract, Large category.  (I didn't realize there was a "Large" or "Small" subcategory, interesting.)

"Colorstrips #1" by Lynda Faires of Louisville, CO

It is machine pieced and quilted and is an original design.  She says, "this quilt was created by an improvisational design process based on strip piecing solid colors to create bands of fabric with color or tonal gradations.  These bands were then cross-cut to create new strips used in the final construction.  I am a retired spectroscopist and love color."

I don't think you need to be a spectroscopist to appreciate the effect of this quilt.

Finally, here is another similar looking quilt.  It is called "Sky High" by Kate Stiassni and quilted by Jackie Kunkel of New York, New York.

"Sky High" by Kate Stianssni, quilted by Jackie Kunkel

It is strip pieced, machine pieced and quilted.  The design source is Chinese Coin, Amish Bars.  The quilter says, "New York City is a very vertical place.  Living there and constantly looking up has created a vocabulary of color, line, and shape for my quilts.  I am also mindful of how the earliest American quilters typically made their quilts by adding small pieces of fabric or strips to an ever-growing top.  Thus, I have called upon both deeply rooted tradition and urban modern architecture in composing and rendering this quilt."

Well, there you go.  Three modern quilts, all similar in that they are combined bars of colors, but all from different inspirations, and approaches.

Thanks for reading today,

Jen

Saturday, September 21, 2013

Last Day for the Craftsy Saleabration

Just a quick reminder that today is the last day for the fabulous Saleabration at Craftsy.  Some of the classes are up to 75% off!!  It is a great time to stock up or get the ones that have been lingering on your wish list!  There are also great prices on fabrics and yarn.

Some of my recommendations:
Tinker Tote front
  • The Quilt as you Go Patchwork Bags 
  • The Big Techniques from Small Scraps 
  • Inset and Applique Circles 
  • Both of Angela Walters FMQ classes 
  • Continuous Line Quilting with Ann Petersen.- I checked this one out this week and think this is a great class for beginners to FMQ!!


So go check out the Craftsy Saleabration: Up to 75% Off All Courses, Fabric and Yarn! and see what strikes your fancy.

Still not sure?  There are also some fabulous Free Classes at Craftsy too.  I really enjoyed the Creative Quilt Backs class, the Free Block of the Month classes, and the Bag Making Basics Classes.

Thanks for reading,

Jen

Wednesday, September 18, 2013

It could just be me - WIP Wednesday


commission quilt WIP

I started piecing a commission quilt today using the Valorie Wells pattern Rosalie.  The cutting took forever, but the piecing seems to be going alright.  I fear it might be a bit more orange than expected (although, it could just be me).  As long as there are no changes, I am slightly ahead of schedule for once!

This Wednesday...

Completed Projects:
  • Bee Blocks - Lucky Star May and August complete, Simply Solids September
  • Candy Corn Table Runner - just for fun
  • Swoon - I now have 8 blocks done out of 12 for my twin size quilt
  • QAYG bags - 1 more done! Boy these were fun.  You can see it  here.
On-going Projects:

AKA - "stuff I plan to touch this week or next".
  • Bee Blocks & BOM blocks -  Lucky Star BOM (5 blocks), 
  • Star of Africa Bee - 3 blocks to do
  • Swoon - 4 more blocks to go
  • Commission quilt - piecing in progress
  • Summersville Drunkards Path blocks - this is my Lazy Bums project this month.  They were originally just supposed to be a bunch of hot pads, and maybe that is what they will end up being in the end.
  • OBW Quilt Along - fabric selection in progress
  • Handstitched Medallion quilt - this one had to move up the ranks.  I entered it into a local quilt show coming up very soon.  My last border is started, but will take a while.  Cross your fingers I will manage to finish it before the show.
Back, Back, Back Burner:

I periodically think about working on these projects, but they are lower priority than the ones above
This week's stats:
Completed projects - 2 plus lots of blocks
New projects - 2
Currently in Progress - 7 ish

Don't forget to link up any blocks you have been working on to the Building Blocks Tuesday post.  It stays open for a whole week.

And as always, thanks for reading,

Jen

Quilter in the Closet

Linking up with


 WIP Wednesday at Freshly Pieced

Tuesday, September 17, 2013

Rude Awakening - Building Blocks Tuesday

My mom-cation wasn't quite long enough!  6 am came way to early yesterday, and to follow up that rude awakening, I also had a dentist appointment.  (I really don't enjoy going to the dentist.)  There was no easing myself back into the daily routine, that's for sure!  It was dive right it, or else.

The time away was very nice.  My companion, who was also in need of a little mom-cation herself, and I relaxed, read books, ate out, and chatted about things we never quite get to before being distracted by our kids or our schedules.  So it was lovely.

I only have one block to share today and it is one I finished just before my trip.

Lucky Star May

This is the May block from the Lucky Star Block of the Month program.  I am very behind (as you can see from me doing May), but I have a bunch of other paper piecing to do in the next couple of weeks, so I may be able to catch up a bit.

What have you been working on this week?  I would love to see.  Link up your fabulous blocks.  You put a lot of hard work into them - show them off!  This free linky will stay open for a whole week.


Quilter in the Closet

Rules:

1) Please link up only to the page in your blog showing your wonderful blocks, not just the blog homepage.  Flickr pictures are also OK.
2) Make sure to put your blog name as the description so people know where they are going or the name of your block!
3) Please grab my button and post it in your blog post or sidebar.
4) Visit other linky participants!

Thanks for reading!

Jen


Saturday, September 14, 2013

Another great Craftsy sale!

I told you guys a great Craftsy sale was just around the corner!  They are having their fabulous Saleabration starting today and going through next Saturday, September 21st.  Some of the classes are up to 75% off!!  It is a great time to stock up or get the ones that have been lingering on your wish list!  There are also great prices on fabrics and yarn.

Some of my recommendations (I hope I am quoting the prices correctly):
Tinker Tote front
  • The Quilt as you Go Patchwork Bags class is on sale for $24.99!  
  • The Big Techniques from Small Scraps class is on sale for only $14.99 (this one might be useful to those doing the One Block Wonder Quilt Along as Sarah shows you a bunch of ways to use that 60 degree ruler in one of her segments)
  • Inset and Applique Circles is on sale for $9.99
  • Both of Angela Walters FMQ classes are on sale for $24.99!
So go check out the Craftsy Saleabration: Up to 75% Off All Courses, Fabric and Yarn! and see what strikes your fancy.  There are some art classes and even some cooking classes that I am hoping to take advantage of during this sale.  I am also interested in the new Continuous Line Quilting with Ann Petersen.

Don't forget there are also some fabulous Free Classes at Craftsy too and any purchases you make through my affiliate links go directly to funding giveaways on my blog in the future.  I DO like giving stuff away :)

Thanks for reading,

Jen


Friday, September 13, 2013

Tinker tote 2, the sequel - a finish Friday

I told you I would be making more of these bags!  I made this one for my friend, who happens to be away with me on Mom-cation this weekend.

Front of Tinker Tote 2


What better "Welcome to Paradise" gift than a beach tote complete with beach towel and a couple magazines?  Her favorite color is blue, so I tried to stick to blue, navy, and aqua.

Back of Tinker Tote 2

I just love the lining fabric!  I used up nearly all that I have of this chevron.  I may have to get some more.

Inside Tinker Tote

As I mentioned previously, I took the Craftsy Class,  Quilt-As-You-Go: Patchwork Bags, a few months ago and really enjoyed it.  I made my first bag a couple of weeks ago, but wanted to tinker with the pattern a bit.  I choose to shorten the length of the bag a bit, which brought the center section up so it wasn't quite so low.

Front of Tinker Tote 2

With the first tote, I had the feeling that if it really were full of stuff, some of it might fall out because the midsection was so much lower than the sides.  I also lengthened the straps a couple of inches.  The original tinker tote had plenty of room for my arms to fit through the straps and I wasn't bothered by where it fell on my hip, I just didn't want it right up under my armpit.  Again, if the bag was actually full of stuff, this area might be a little uncomfortable.  Plus, since I altered the height of that midsection anyway, I needed a tad bit more room.

One more alteration I made....I inserted some Peltex into the bottom of the bag, after I boxed the corners, but before I put the lining in.  When you make the bag, you have a large bulky seam at the bottom of the bag.  It didn't bug me too much, but I thought if I could eliminate the bump it created, it would be better, right?  I simply cut a rectangle of Peltex roughly the size of my boxed bottom, and sewed it in place as best I could right through the seam on the bottom of the bag.   I didn't want it accidentally shifting, so I felt some stitches were necessary, but I didn't worry too much about going deep into the corners.  It was an awkward part to sew as it was.  The Peltex just smoothed out the bottom enough that you don't feel that bulky seam.  It had the added benefit of giving even more support to the shape of the bag.

I can still say that I highly recommend Quilt-As-You-Go: Patchwork Bags!  I know a sale is right around the corner, it would be an excellent grab at a good price.  Personally, I can't wait to try the technique on some other things.

Thanks for reading today,

Jen


Linking up with:


Tuesday, September 10, 2013

No rain, just gray - Building Blocks Tuesday

I was hoping that the weather would clear up this morning so I could get some better pictures of the two blocks I have to share this week, but alas, the cloud cover remains.  No rain, mind you, just overcast and gray.

I've completed two more Swoon blocks and here they are...

IMG_3365


Swoon block 7

That brings my total up to eight, but I need several more to complete my quilt top.

In other news, I am headed out on a little Mom-cation trip later this week.  I am not planning on bringing any projects with me (it's just not that kind of trip).  Instead, I bought two books to read!  I know that doesn't sound that exciting, but since having kids, I rarely find time to read more than a magazine article.  Well, I take that back.  I have read numerous Barbie stories, all the Nancy Clancy and Amelia Bedelia books that have been released, and have also finished How to Tame Your Dragon, Book 1 recently.  But that doesn't really count as grown up reading, does it?  No, the books I am packing are more mature than the bedtime stories I read to my kids.  I MIGHT even feel like a grown up on this trip, but I'm not promising to act like one!

What have you been working on this week?  I would love to see.  Link up your fabulous blocks.  You put a lot of hard work into them - show them off!  This free linky will stay open for a whole week.


Quilter in the Closet

Rules:

1) Please link up only to the page in your blog showing your wonderful blocks, not just the blog homepage.  Flickr pictures are also OK.
2) Make sure to put your blog name as the description so people know where they are going or the name of your block!
3) Please grab my button and post it in your blog post or sidebar.
4) Visit other linky participants!

Thanks for reading!

Jen


Sunday, September 8, 2013

Inspirational Sunday 5 - via the 2013 International Quilt Festival in Long Beach

This is week is for the dogs!

The first quilt is called "Who, Me?" by Ruth Powers of Carbondale, Kansas.

"Who Me?" by Ruth Powers of Carbondale, KS

It is machine pieced, free-motion machine quilted, and embellished.  She says, "This mischievous puppy has found a way to get noticed!  As a gardener and a dog lover, I have been there, done that!  As an art quilter, I jut had to piece this whimsical puppy whose photo I took one day.  The tulips were added from my imagination to set the scene in springtime, so I had a combination of a photo and a sketch to work from.  The fabrics are both commercial prints and hand-dyes.  Who, Me? is heavily free-motion machine quilted with a variety of threads to enhance the piece."

"Who Me?" by Ruth Powers, close up

Just look at the lovely free-motion quilting!  This picture also gives a hint to the piecing.

The second quilt had me chuckling.  While I have a cat and not a dog, I can still relate to the mischief that pets get into.  The quilt is called "Crime Scene Investigation" by Pauline Salzman of Treasure Island, Florida.  It won 2nd place in the Art-Whimsical division.  It is fused appliqued and machine quilted.

"Crime Scene Investigation" by Pauline Salzman of Treasure Island, FL

It was Pauline's original design and even her description had me laughing, "Their stories are written as told.  These are the facts and nothing but the facts.  Someone else did the damage.  Not them; they are innocent until proven guilty beyond a reasonable doubt.  Plus, they are too cute to do anything bad....just ask them."

"Crime Scene Investigation" by Pauline Salzman, close up 1

The free-motion quilting on this one is amazing too, but the little "confessions/excuses" are hilarious.

"Crime Scene Investigation" by Pauline Salzman, close up 2

What kind of mischief do your pets get into?

Thanks for reading today,

Jen


Wednesday, September 4, 2013

Candy Corn Table Runner Tutorial


Candy corn table runner
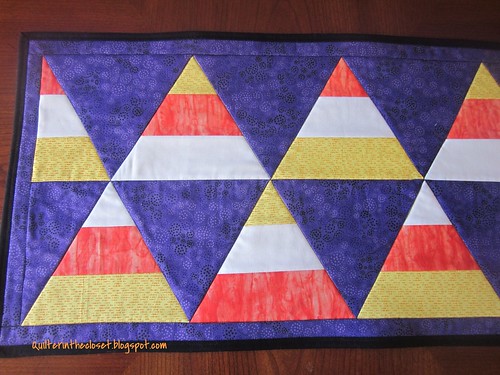
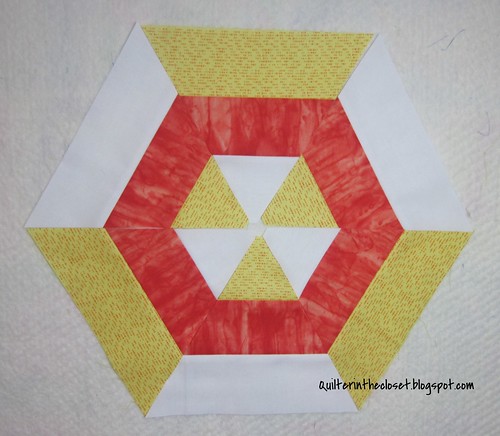
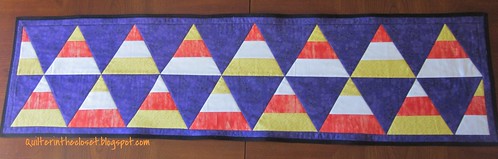
Candy corn table runner is 54 inches long by 13.5 inches wide
This is more of a "How to use your 60 degree triangle ruler" tutorial, but I figured with Halloween just around the corner, I might as well adapt it to fit the holiday.  It's been ages since I've eaten candy corn, but the girls are already spotting it in stores and salivating at the prospect of trick or treating.

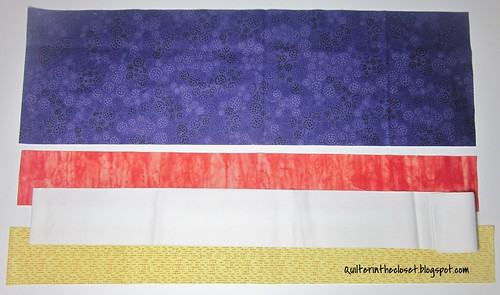
Here's what you will need:

Candy corn tutorial strips
  • 2.5 inch x WOF strips - 2 each of white, yellow, and orange
  • 6.5 inch x WOF strips - 2 of purple (or whichever background color you like)
  • 60 degree ruler
  • 16.5 x 57 inch piece of batting
  • 16.5 x 57 inch piece of backing fabric
  • approximately 148 inches of binding fabric (2.5 inch for double fold)
  • rotary cutter, sewing machine, thread, etc.
  • optional border - Three 1.25 inch x WOF strips of purple 

The following directions are for right handed rotary cutting.  My finished table runner was 54 inches long by 13.5 inches wide before binding.

Step One - Make your strip sets

Taking three of your 2.5 inch x WOF strips, sew them together length wise.  The candy corn I spied at the store was yellow on top, orange in the middle and white on the bottom, but it really doesn't matter.  Repeat for you other 3 strips.  Mix up the order if you like.  Your strip sets should measure 6.5 inches wide x WOF.


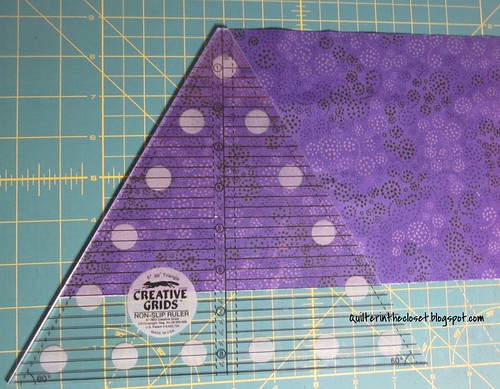
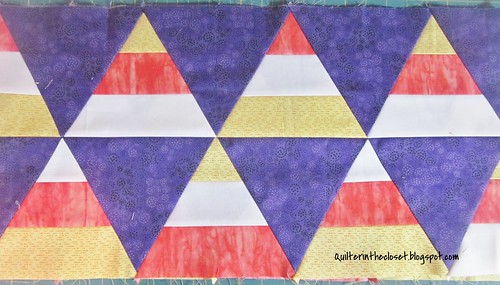
Step Two - cut 30 degree triangles:

Take one of your purple 6.5 inch strips, folded selvage to selvage, and cut off selvages making sure the edge is square.   Line up your 60 degree ruler with the dotted line left of the center of your ruler.  Also line up the flat tip of the ruler along the top edge of your fabric strip and the bottom edge of your strip should follow the 6.5 inch line across the ruler.  Cut along the angle.  You should now have two 30 degree triangles.

Candy corn tutorial 30 triangle


Why the dotted line to the left?  Think of it this way, you need 1/2 a 60 degree triangle, but you also need 1/4 inch seam allowance too.  So choose the dotted line that will add that seam allowance.

Why do you need a 30 degree triangle?  Well, if you want your sides to be straight, you will either need to add 30 degree triangles on the sides or you will be slicing a little less than half of your 60 degree triangles off into the scrap pile at the end.  I just figure since your strips start with that nice square edge that is perfect for getting some 30 degree triangles, and you have to make a similar cut to start the 60 degree triangles anyway.  It's a win/win.


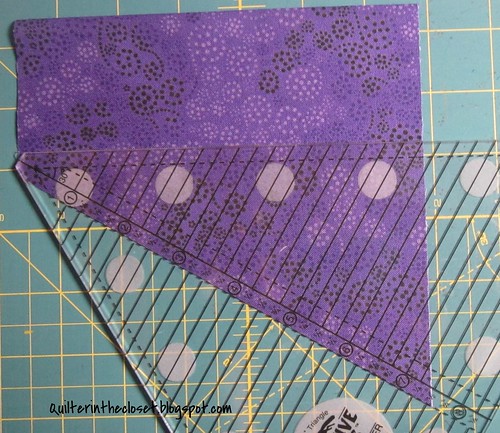
Step Three - cut 60 degree triangles

Now that you have one angled cut, line up you ruler facing away from you with the 6.5 inch line across the top of your strip, and the blunt end of the triangle on the bottom of your strip.  Cut the new angle.  Because your strip is folded, you are cutting two 60 degree triangles at a time.

Candy corn tutorial 60 degree triangle

Now rotate your ruler around to face you, lining up the 6.5 inch lines and blunt tips, and cut again.  Continue rotating your ruler around until you are near the end of your strip.

Candy corn tutorial 60 x 2

At this point, you can either open the fold and cut one more 60 degree triangle, or line up the dotted line to the left of center again on the ANGLED cut.  The blunt tip of the ruler should be in line with the top edge of your strip.  Cut along the angled portion of the ruler, noting that it is actually cutting a perpendicular cut, making a 30 degree triangle. 

Candy corn tutorial 30 x 2

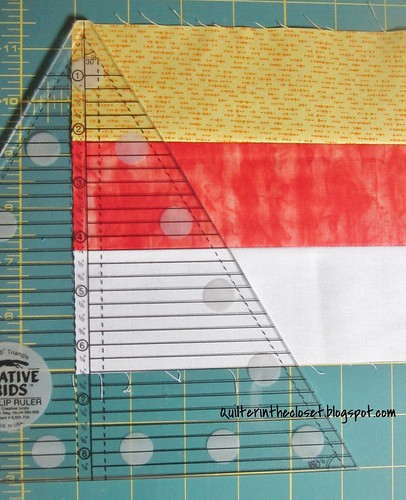
Step Four - repeating cutting with your strip sets.

Now take your strip sets (yellow, orange and white).  You can fold them in half lengthwise, lining up the seams, and make your cuts, but I find that my cutting gets a little messy at some point.  

Candy corn tutorial 30 degree strip

Start with your 30 degree triangle at the end, then continue with your 60 degree triangles until you reach the end of your strip.  If you have room at the end, it never hurts to get one more 30 degree triangle out of the other end.

Candy corn tutorial 60 degree strip

Repeat for your second strip set.

Step Five - Play around with possible layouts

Candy corn design wall

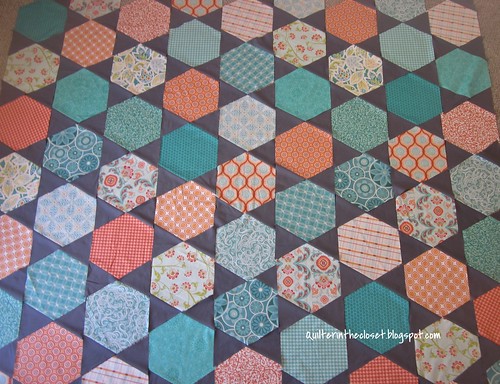
These triangles you have cut can make all kinds of fun designs.  For the table runner, I chose the 1000 Pyramid design, but if you would rather have a wall hanging, try some hexagons.

Candy corn hexagon


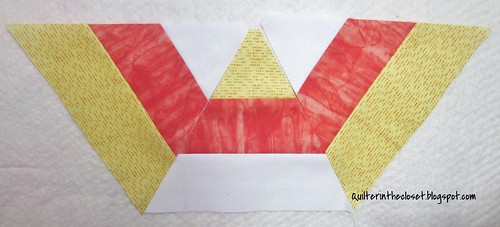
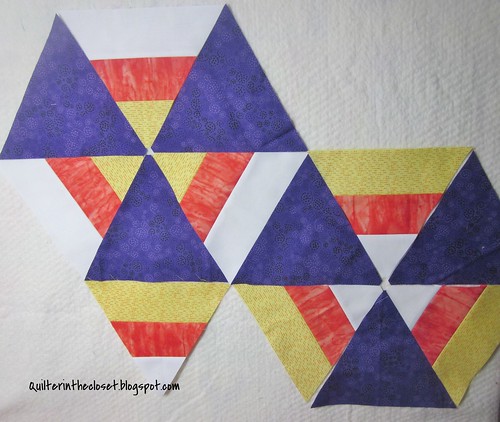
Here's a picture of how half of the hexagon would be pieced together (see all those blunt tips together).  You would then add a background triangle to either side.  Notice how it is forming a straight row?  For those of you doing the One Block Wonder Quilt Along, this is essentially how we will be making hexagons.

Candy corn half hexagon

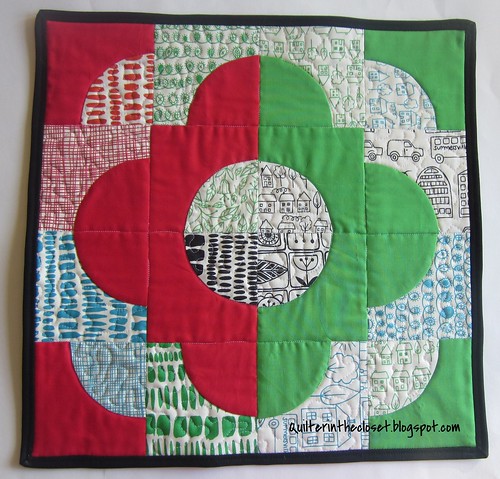
You can even mix up the hexagons, though I thought this reminded me a little too much of a radiation warning sign.

Candy corn all mixed up

These are just some of the things you do with the triangles you cut.  You can also use the ruler to make diamonds, and combine them with triangles to make lovely stars.  Sarah Fielke's "Big Techniques from Small Scraps" Craftsy Class has a whole segment on this ruler.

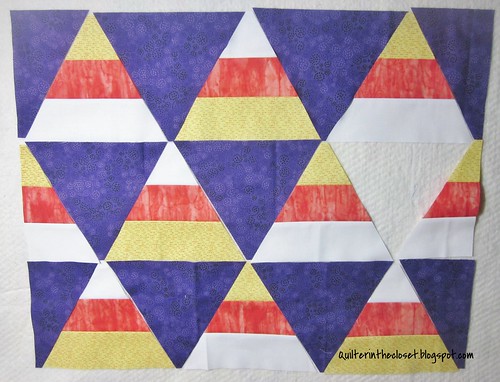
Step Six - start piecing in rows

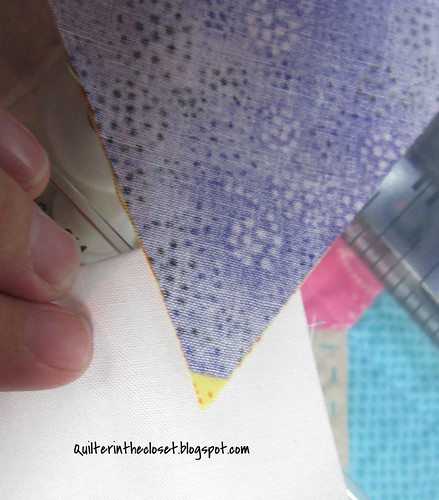
After you have chosen your final layout, start piecing the triangles together, lining up the edges.  You will want to start and finish each row with a 30 degree triangle.  This gives us nice straight edges along the sides of your quilt.  For the table runner, I pieced fourteen 60 degree triangles and two 30 degree triangles in each row, alternating between my candy corn and the purple background triangles.  For my second row, I started with the opposite (candy corn or purple) than my 1st row started with.

Piecing tips:  The blunt tip on the end of the ruler will show you where your seam allowance should start.  

Candy corn tutorial tips

Just remember as you add more triangles to your row, one edge will always line up straight across.

I didn't feel the need to press as I went.  I just sort of finger pressed toward the dark background triangles since they were darker.  Once my row was together, I pressed the seams to reinforce that direction.

Once you have your rows completed, sew them together.

Candy corn tutorial table runner

Step Seven - finishing

If you desire, add a border.  Mine is only 3/4 inch wide.  Then baste together with the batting and backing, quilt as desired and bind.

Candy corn table runner closer

I chose to just stitch in the ditch for my table runner.  This decision had more to do with time than anything else.  I thought a fun loop-de-loop with a bat motif mixed in here or there might be fun.  My personal preference would be to keep the candy corn unobstructed with a design, but those purple background triangles are screaming out for something fun.  Maybe I'll go back later and add something in those spots.

This pattern could also be adapted to make Christmas trees, especially if you added a sashing between rows with some squares to be the trunks of the trees.  Just a thought! 

Candy corn mug rugs

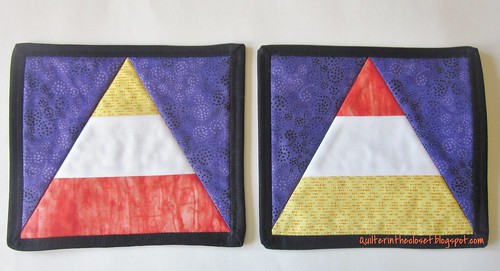
I did have several triangles left over, and made these little candy corn mug rugs.  They are really closer to over-sized coasters, but they are cute.  Anybody want one?  Just leave me a comment telling me what is your favorite Halloween treat.  I will draw two winners this Friday, September 6th and they will each get one little coaster/mug rug.  This giveaway is open internationally.

This giveaway is now closed.

Thanks for reading today,

Jen