
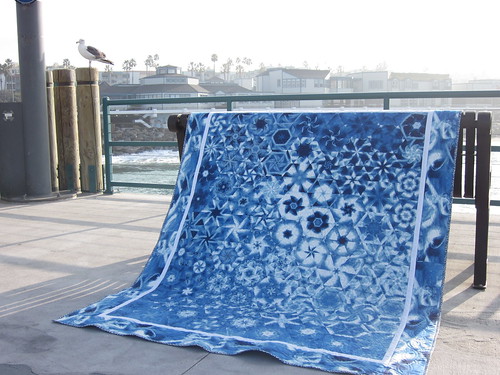
Where to begin?
I guess, we should start with the piecing. The One Block Wonder pattern is 6 triangles pieced together to form those hexagon shapes. Actually, you piece 3 together, form long, long, long rows then sew the rows together. The result is that you have some bias edges, but more problematic is that you have very bulky seams in places.
I pieced this one together a really long time ago, but I pressed my seams open. Perhaps I could have clipped them a little differently to reduce some of the bulk, but I am not sure it would make a huge difference. I didn't even notice the bulkiness until I started quilting.
Before I get ahead of myself, let me stop and also talk about basting.
In January, I took Cindy Needham's Craftsy class AND her Ready Set Go Quilt! class at the Road to California quilt show. In both classes, she teaches her basting method. So of course, I wanted to try it out! She teaches you how to "tension" the backing of your quilt and hold it in place (clips) while you spread your batting and top out on top, then you pin baste.
Normally, I spread out by backing, smooth it nicely, clip it to the table, add the batting, smooth it, clip it to the table too, lay out my top, smooth it, clip it to the table too. I make sure all the layers are smooth, but I don't "tension" or stretch any of them. But, I view Cindy as a guru of sorts, and I noticed in Leah Day's (another person of guru status around here) Craftsy class that she really tensions her backings tightly onto the table too.
I followed Cindy's instructions, and I am confident that I did it correctly. I didn't stretch the backing TOO much, but it was nice and tight. I laid my batting down, smoothed it and then the top and went about pinning and smoothing as I went, just as Cindy teaches. When I took it off the table, it looked fine. No creases, no pleats, nothing out of the ordinary. BUT, when I started quilting it there was a noticeable difference in the amount of fabric that I was dealing with on the top of the quilt. Meaning, my top was not smooth any longer but had slightly more fabric. Hard to explain. It wasn't wrinkled, it was just "loose".
Luckily, I choose to just do a simple all over stipple for the middle of my quilt. That quilting pattern is pretty forgiving if you have some extra fabric that you are moving around because your quilting lines don't touch. Usually by "tensioning" your hands (spreading the fabric out with your hands) and wiggling around with the stipple, the excess fabric just gets rationed out into the quilting design and you don't notice it. Where that extra fabric really began to give me trouble was in the borders.
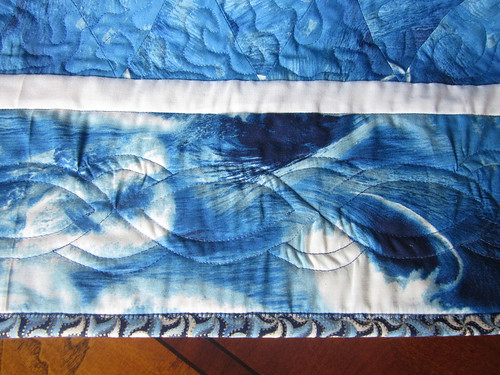
Pleat city! Yes, small pleats, but pleats! That rope quilting design was much less forgiving than the stipple, because the lines intersect. I really had a lot of extra fabric to deal with. When I say "a lot", I guess I am exaggerating a bit, I didn't have a ball of fabric or anything, but the top and batting were just so much looser than the backing that yeah, it squished it up a bit. I tensioned my hands like crazy, but it was going to help me when my quilting lines started to connect with one another. There just wasn't enough room to ration out that excess fabric as the lines started to near each other. Result = small pleats. Hopefully, these will blend in after washing.
Now back to those bulky seams...they are hard to quilt around and through. But that is what I tried to do. Where possible, I tried to make my stipple line go directly down through the bulky seam in order to flatten it out.
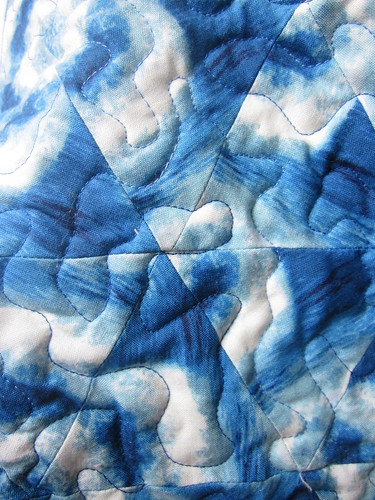
I don't know if this is right or wrong, but it did seem to help wrestle those bulky parts into submission. HOWEVER, where it wasn't possible for me to go directly through the seam -- perhaps it was so bulky my foot wouldn't fit over it -- I got as close as possible, but with a poor result. Because the center of the bulk wasn't nailed down by quilting stitches, the result is a "nipple" in the quilt. Well, that's what if feels like! Get your heads out of the gutter for just a second.
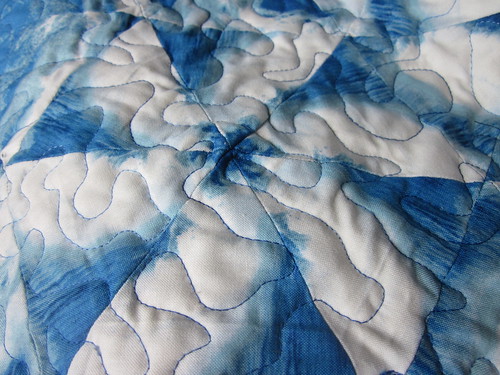
You see how it has puffed up that intersection of seams, and since there are bulky seams underneath, it is hard. It feels like a nipple under a shirt.
What could I have done to avoid these areas? Well, it just so happens that Cindy advocates stitching in the ditch EVERY seam before you do any other quilting design. She calls it ESS - "Every Stinking Seam". When she said this in class that Friday, I remember thinking, "that's easy for you to say lady, you didn't just take a class with a baby quilt with 723 pieces!!!". But, she is right. I would have had to use my walking foot because of the bulkiness. But, just looking at the intersection above, I would have sewn over that area 3 times instead of once. That would have really nailed down that seam.
Honestly, I was lazy. All I was thinking was how an easy all over stipple would spread out that excess fabric I was dealing with. I gave little thought to the bulky seams.
In case you are wondering, Cindy recommends ESS for every quilt, or "ESQ" if I may. She showed us several examples of how it really improves the look of your piecing skills and makes your quilting designs better because they are stabilized and don't warp during the quilting process. Both her "in class" lecture and the one on Craftsy shows these samples, but obviously seeing them in person you can really see the difference better than on camera. Did I head such advice? Uh, not this time obviously.
So to recap my lessons learned from this quilt:
1) If it's not broke, don't fix it! I personally like my basting method better. There have only been a few times where I have had any issues of pleating or gathering on my backing and I could probably point the finger at the quilt bunching up while in the machine rather than the basting method. I also like having the top and batting tensioned the same. Also, my hands are also a lot less sore because I don't have to tension them while quilting as much (even with gloves).
Finally, I want to share something that I had forgotten that another teacher told me - I believe it was Dawn Cavanaugh who was teaching us how to load our quilts into the long arm frames in the long arm class I took. None of the layers were tight. Smooth yes, but not tight. She sited how hand quilters put their quilts into their frames with some slack. Yes, some of that has to do with the fact that you need a little room to rock the needle, but she said the same applied to machine quilting. You don't need anything super tight. Excess fabric is a problem, but introducing any stretch to your quilt is just going to make it shrink up and cause distortion in the stitches. Personally I think as long as everything is done evenly, at least your quilt will be consistent. That is why I think Cindy's technique is unbalanced. My bottom layer is tensioned differently than the other layers, so of course it is going to behave differently and influence my other layers.
The OBW isn't the only quilt I tried Cindy's method on. I also basted the Discontinuity baby quilt with the 723 pieces (I really need to come up with a better name for it that "Demon Quilt") using her method. I didn't have exactly the same problem. BUT, I think it is because there are different things going on with the baby quilt than with the OBW. First of all, I have all those rows of horizontal seams that I am stitching in the ditch with my walking foot. Quilting straight lines is different because I only need to spread out 3 inches of fabric at a time and I'm only travelling in one direction, not wiggling all over the place. I've also double batted that quilt, so it puffed up nicely in those rows and filled any excess fabric there. There was some excess fabric around the edges of the quilt, which makes a little sense as the center of the quilt had the benefit of the weight of the rest of the quilt to smooth it out. That excess around the edges made my perfectly square quilt a little less square at the end of the quilting process. Luckily, it wasn't too off and I could trim the offensive corners a little.
Just like teachers say, "Every child is different", well every quilt is different too. For now, I'm going back to my old way of basting. If it ain't broke, don't fix it.
2) Stitching in the ditch for ESS might be worth it. Yes, it is going to take longer. But I think it would have given me less headaches in the long run on the OBW quilt. I did ESS on the Discontinuity quilt and while it took forever, it did nail everything down nicely. Unfortunately, I didn't attempt to free motion quilt over all that ESS to see if it really made a difference. I plan on doing that for my next quilt, the Les Amis quilt, so I can report back on that when completed.
There are always more lessons to be learned!
Thanks for reading today,
Jen


