Tuesday, April 29, 2014

Guild blocks - Building Blocks Tuesday


Guild BOM for April

I haven't had much time in front of the sewing machine this week, but I did finish a few of these blocks for the guild's monthly BOM.  The guild collects them and turns them into auction quilts for charity.  I made 6!

Guild BOM for April

After all, chain piecing 6 goes about the same rate as chain piecing 2.  I must say, these are not my usual colors, and working with flannel was a bit "interesting" since my machine really wanted to stretch it.  But, this color scheme will do well up in the mountains where the guild is located.

What blocks have you been working on?  I would love to see.  Link up your fabulous blocks.  You put a lot of hard work into them - show them off!  This free linky will stay open until the first Monday of next month, but I will repost it every Tuesday until a new month starts.


Quilter in the Closet

Rules:

1) Please link up only to the page in your blog showing your wonderful blocks, not just the blog homepage.  Flickr pictures are also OK.
2) Make sure to put your blog name as the description so people know where they are going or the name of your block!
3) Please grab my button and post it in your blog post or sidebar.
4) Visit other linky participants!

Thanks for reading!

Jen


Sunday, April 27, 2014

Inspirational Sunday (29) - via the 2013 International Quilt Festival in Long Beach

We've had several very colorful, bold weeks here on Inspirational Sunday, but today, I thought I would share several beautiful quilts that are more muted in color - not necessarily low volume.

The first one is so cool!  It is called "Childhood Memories" by Eileen Campbell of Kew, Victoria, Australia.  It is machine appliqued, embroidered, quilted, couched, and painted.  Her design source was her childhood memories, the beautiful forest and dancing Lyrebird.

"Childhood Memories" by Eileen Campbell of Victoria, Australia

She says, "One very special holiday my family stayed in a bush cottage in Sassafras.  The forest there has giant Mountain Ash trees, an understorey thick with smaller trees and ferns and a creek running through it.  The gully is quite dark but exciting with lots of bird life.  Every morning a male Lyrebird would come up from the gully and sing and dance to his reflection in a window.  Not many people get to see them in the wild.  It was such a privilege to have a private display each day.  Flowers have always been a passion of mine.  The yellow flowers are derived from ivy goodenia (Goodenia hederacea).

"Childhood Memories" by Eileen Campbell, close up

I think what I appreciated most about this quilt was the beautiful photographs that were incorporated, which she took great detail in labeling on the back of the quilt.

"Childhood Memories" by Eileen Campbell, back label

The second quilt is called "Late Autumn" by Hiromi Yokota of Yokohama, Kanagawa, Japan.  It is appliqued, pieced, hand quilted, and embroidered.  It was inspired by autumn.

"Late Autumn" by Hiromi Yakota of Kanagawa, Japan

The quilter's statement says, "I wanted to be freed from a proper work, a work made precisely.  I made it with no straight lines, daringly, happily, freely.  I made the border with an image of the flower arrangement of Japan.  I did all the applique by hand.

"Late Autumn" by Hiromi Yokota, close up 1

I find the border very interesting.  It looks like found a fabric with the flowers she wanted, cut them out, and appliqued them into the border.  I think the technique has possibilities!  

"Late Autumn" by Hiromi Yokota, close up 2

The last quilt for today is called "Crosses" by Ikuko Ueno of Nagoya, Aichi, Japan.  It won 3rd place in the Traditional Pieced category.  It is English paper pieced, and hand quilted.  The design source was inspired by Lucy Boston's book, Patchwork of the Crosses.

"Crosses" by Ikuko Ueno, of Aichi, Japan

"I have loved the quilts of Lucy Boston for years; however, I hesitated to make one.  Because it is necessary to cut the paper for piecing by oneself, it was a big challenge for me.  The scallop on the border is original.  I wanted to complete all of the quilt using the paper piecing technique.


Perhaps it is only because I started subscribing to the magazine Quilt Mania, but I feel like I am seeing more and more of these colors.  I know they were very popular in the past.

What do you think of these colors?

Thanks for reading today,

Jen


Tuesday, April 22, 2014

Lucky again - Building Blocks Tuesday

Ta-Da!  Another Lucky Star BOM block to share.  This one is called "Sunlight Star".  It was the 2013 June block.  Since my last block was mostly gray, I chose to make this one mostly yellow.  I love how it turned out.

Lucky Star BOM June 2013

But, I need your help with this one.  I look at this block and I really like the pattern, of course I like the colors, but I'm not sure I like it any better than the other Lucky Star blocks I've done.  So, it boggles my mind how the picture of this block has gotten so many views on Flickr, and before I even posted it here??  I only uploaded it on Sunday.  I added it to two groups, my Lazy Bum group and the Stitching with Don't Call me Betsy group (cause it's her pattern and BOM).  As of lunchtime yesterday, it had already received over 2700 views, at dinner time it was 4600!  The only other picture I have had reach 4 digits is the one of my Handstitched Medallion Quilt, but that was just over 1400 (and that took months).  Another oddity is that half of the people favoriting it are photography types??  This photo is terrible photography, so I just don't get it.

Handstitched Medallion Front

So please tell me what is so special about this Lucky Star block (so I can do more of whatever it is!)?  I really do want to know.  I'm starting to get a bald spot on my head where I've been scratching it. Thank you!

What blocks have you been working on?  I would love to see.  Link up your fabulous blocks.  You put a lot of hard work into them - show them off!  This free linky will stay open until the first Monday of next month, but I will repost it every Tuesday until a new month starts.


Quilter in the Closet

Rules:

1) Please link up only to the page in your blog showing your wonderful blocks, not just the blog homepage.  Flickr pictures are also OK.
2) Make sure to put your blog name as the description so people know where they are going or the name of your block!
3) Please grab my button and post it in your blog post or sidebar.
4) Visit other linky participants!

Thanks for reading!

Jen


Sunday, April 20, 2014

Inspirational Sunday (28) - via the 2013 International Quilt Festival in Long Beach

After finishing my modern baby quilt this week, I feel like continuing with the modern vibe for this week's inspirational post.  There are several modern quilts from the show that I haven't shared yet, so here are half.  I will share the last few next week.

This first one is called "Cantilevers" by Jessica Levitt of Bridgewater, New Jersey.  It is machine pieced and free-motion machine quilted.  The design source was a trio of windows on a building.

"Cantivlevers" by Jessica Levitt of Bridgewater, NJ

Jessica says, "I wanted to repeat the design elements of the windows in a structured way, but not in a traditional block format.  A longer element originates off the edges of the quilt.  Thus they are cantilevers that extend onto the quilt surface.  I chose to use vibrant solid fabrics in crisp, modern colors to echo a sparse modern building element.  I also used slight variations in the shades of both the background and the bars to add interest.  The background quilting adds movement and contrast to the straight-lined piecing."

"Cantilevers" by Jessica Levitt, close up


And look!  She used my favorite swirl design for the quilting!

The next quilt is called "Zinnia" by Lynn Harris of Chelsea, Michigan.  It is machine quilted.

"Zinnia" by Lynn Harris of Chelsea, MI


Lynn says, "The quilt (design and colors) was inspired by a photo I took of zinnias growing in our garden a few years ago.  The quilting is a bit "organic" in nature.  It is made up of many rows of parallel wavy lines.  With its simple, asymmetrical design on a solid gray [back]ground, this quilt fits with the modern quilt theme."

This design sure would be a great way to use up some orphan HST's!  And I like the wavy quilting.

The next quilt is called "Tilework" by Elizabeth Harvatine of Toluca Lake, California.  It is pieced.  (Don't you just love some of these descriptions?).  The design was inspired by her fabric selection.

"Tilework" by Elizabeth Harvatine of Toluca Lake, CA

She says, "The fabric colors have a calming, soothing feel to them and I wanted to design something clean and precise to balance that feeling.   The color scheme is modern and unusual but still pleasing to the eye."

"Tilework" by Elizabeth Harvatine, close up

This last one is called "Broken Plaid" by Alissa Carlton of Los Angeles, California.  It is pieced and machine quilted.  The design was inspired by her ongoing exploration of non-block based quilt design and the look of weaving with piecing.

"Broken Plaid" by Alissa Carlton of Los Angeles, CA

She says, "Broken Plaid reflects the modern quilting movement in its use of negative space, color choices and bold graphic design.  The impact given by the piecing design is enhanced with the straight line quilting that maintains the plaid concept of the piecing."

I like how the quilting lines make a plaid-like texture on the quilt.

I just finished Jacquie Gerings new Craftsy class "Creative Quilting With Your Walking Foot".  It was pretty darn good!  I'm anxious to try out some of the methods she discusses to get these more modern looks in my quilting.  You would think they would be rather simple, but there is actually a bunch of preparation and accuracy needed.  Jacquie does a great job teaching you what it takes, and she is a fun/funny instructor too.

Have you tried any of the "straight-line" quilting techniques on your quilts?

Thanks for reading today,

Jen

Saturday, April 19, 2014

Blogger's Quilt Festival is Coming Soon!

After taking the last one off, I can't wait for the return of the Blogger's Quilt Festival over at Amy's Creative Side.
AmysCreativeSide.com

Twice a year, Amy hosts this fabulous event where anyone can show off their quilts in a fabulous online quilt show.  And of course, there are prizes.  Honestly though, just getting to see everyone's creations is tops!  I've been inspired by so many of the entries and found way too many new blogs to follow.

There are all sorts of categories.  If you have a finish from the last 6 months that you are proud of, ENTER it!!  I want to see it!

Hmmm, but what should I enter this year???

Thinking about it,

Jen

Friday, April 18, 2014

Modern Baby quilt - a finish Friday

It's the middle of the month and I finally have a finish to share!

Discontinuity 2

Look familiar?  This is the 2nd quilt I've made in these colors using Emily Cier's pattern "Discontinuity".  I took her class way back in January of 2013, and made this baby quilt (which gave to Olivia).

Discontinuity 1

At the time, I was so tired from piecing all those 723 pieces together that I really didn't want to put much effort into quilting it.  So, it is just stitched in the ditch.   (BORING!)

I really loved the look of this pattern, but the piecing method left me cold.  I had ordered enough fabric to make the quilt into a twin size, and it seemed a waste not to use it.  So, I tried to apply a log cabin approach to the piecing, like I did with Emily's "In the Groove" pattern (see my quilt here).  I reported about the log cabin piecing of Discontinuity 2 here (only one step down seam!).  Then the quilt top sat in a box until about 2 months ago.

basting another pink baby quilt

My husband's cousin had her first baby in January.   Said cousin is very modern, loves art, loves modern art, AND she had a baby girl.  It seemed fortuitous that this quilt should be finished for her.  But, I couldn't just SID, NO!!  Any time saved having a quilt top already pieced had to be channeled into the quilting process!  So I quilted a different motif for each color.  This was made possible by using the log cabin method of piecing.  I'm not sure it would have the same effect if I had made it using the approach in the original pattern.

baby quilt close up

This time around, I also found the perfect backing!

back of Discontinuity 2

I love the texture all that quilting gives, and I hope the baby does too.

Thanks for reading today,

Jen

Linking up with:


Another Craftsy sale - this time it's on supplies

I just wanted to share....
Craftsy

Craftsy's BIG Easter Sale: Up to 75% Off !
**This post contains affiliate links and I will be compensated if you make a purchase after clicking on my links

There is so much more hopping your way this weekend! Craftsy is giving up to 75% off of all fabric, yarn and project kits! This sale is only during Easter weekend (Friday 4/18 - Monday 4/21 at 11:59pm MDT), so be sure to jump on it quick or you will miss it.

I know I am supposed to be on a fabric diet, but I will definitely be checking out the deals.  Last sale I picked up some great yard and 4 yard cuts of Kona solids.  Craftsy also has some lovely Amy Butler, Tula Pink, Joel Dewberry and Kaffe Fassett prints!  I'm just sayin'!!

Jen

Thursday, April 17, 2014

How to Bury Threads - a How "I" Do It Tutorial

I promised a mini-tutorial on How I Bury My Threads, so here it is.

How I Bury My Threads

I go into my yard, dig a hole, put the threads inside, cover them up with dirt, and call it a day.  Ha!  Just kidding!

I know, that wasn't even slightly funny.

Once I am all done with my quilting, I usually have a few threads that need burying.  I don't leave them all to the end, otherwise they get in the way of some quilting lines, but I will do a few seams, then stop for a break and decide to bury whatever threads I have so far.

burying threads

I take my set of threads (there should be a top and bobbin thread), if I haven't already knotted them, I tie a double knot, then thread both threads through my needle.

I like these Clover Self-Threading Needles, Assorted (Amazon link).  It is easy to pop both threads into the end; you don't have to thread both threads through the eye.

You could just use a needle with a larger eye, but usually the larger the eye, the larger the thickness of the needle and I've found that my knots don't stay buried with the holes from larger needles.

Untitled

Now put the needle down into the fabric as close to the same spot as the threads originated. Try to put your needle under the top and batting, but not all the way through to the back.

I usually place one hand under the back of my quilt to be sure I don't go all the way through my layers.

Untitled

I like to have my needle travel parallel to a seam line, and I come back to the surface of the quilt a 1/2 or 3/4 of an inch away from where the needle entered.

Untitled

I usually slide the needle off at this point so I don't poke myself.  Then I GENTLY tug on the threads.

Untitled

***WARNING!  When I first learned how to bury my threads, I kept hearing that I should hear a little "pop" every time.  It is supposed to be the sound of the knot popping back into the fabric.  Sometimes I hear that sound and sometimes I don't.  I have, however, pulled on those threads so hard waiting for the sound that they have snapped right off.  Don't do that.  Give the threads a little tug and if you don't see the knot still lingering on the surface, assume it's good and move on.

burying threads

Now you can clip off the remaining threads with your scissors.

Burying threads seems like a lot of work!  Do you have to do it?

No.  As I mentioned in my SID tutorial.  I knot/bury my threads AND backstitch some of my quilting lines because I want the piece of mind that my quilting won't unravel with use and washing.  In fact, I only recently started burying my threads.

I used to just backstitch a little (or stitch in place a few times if free-motion quilting) and clip my threads from there.  BUT, with some of my kids' heavily used quilts, I have started noticing some of those stitches loosening a bit.  They haven't unraveled yet, but someday they will.

I will admit that on some of my art/wall quilts (that I don't plan on washing), sometimes I skip this step.

**UPDATED***

Heidi at Red Letter Quilts linked up an excellent tip on how to bury really short threads.  It's a great tip so check it out HERE, or click her link up below.

Do you bury threads?  How do you do it?  Link up your tutorials here (on this or any other quilting subject).


Rules:

1) NO QUILT POLICE ALLOWED! - if you are making a tutorial, keep it friendly, as if you were teaching your best friend.  If you are visiting a tutorial, please remember that the authors are simply sharing what they have found to work for them.

2) Please link up tutorial from 2014 only.  Feel free to point out any previous tutorial in your new post, but let's try to keep the links current.

3) Visit other linky participants to see how they do it.

4) Did I mention no quilt police allowed?

Thanks for joining me today!

Jen


Wednesday, April 16, 2014

How to Stitch in the Ditch - a How "I" Do It Tutorial

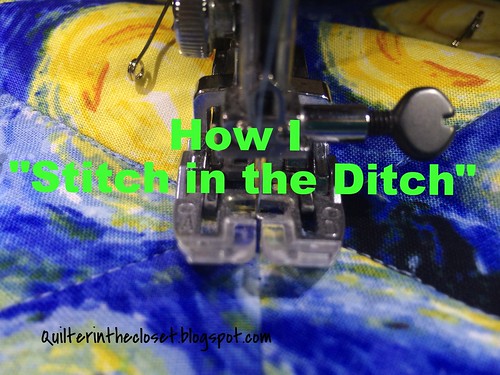
Today I thought I would share a little about how I "Stitch in the Ditch" or "SID" for short.  If Free-Motion quilting is a bit scary to you and simply tying a quilt is not up your alley, SID might be for you.

Warning!  Extremely long and picture heavy tutorial ahead.

1d74f228-990a-400b-8062-9914fe5b91ed

When I took my first basic quilting class, I was extremely disappointed that it did not cover how to do the actual quilting of my quilt top.  The look on my face must have been one of complete shock.  6 weeks, a couple of hundred dollars, and I didn't have a finished quilt.  Are you kidding me?  Whew, deep breaths....

I ran into a similar problem last year with the Beginner Quilt Along, the finishing instructions weren't posted in a timely manner (if at all).  At that point in my quilting journey I knew how to finish a quilt, but I still don't understand how anyone could just leave a beginner hanging there, so to speak.  It is a complete turn off.

So, I want to tackle some of the finishing aspects of quilting first in this series of tutorials.  I realize I am jumping around a bit even in the finishing category, but I hope that in a few months when I start posting tutorials about projects, I will already have tutorials posted on how to "finish" your quilt.  That way, if you are a beginner, you won't be left wondering.

Let's get started!

When you have your quilt top, batting and backing all basted together (yes, my next tutorial will likely be about basting), it's time to secure it with some quilting. "Stitching in the Ditch" is only one way you could do it, but it is a good one to learn as it will come in handy when you learn some other methods.

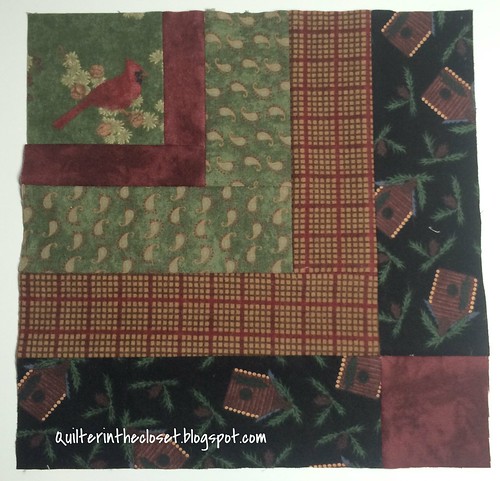
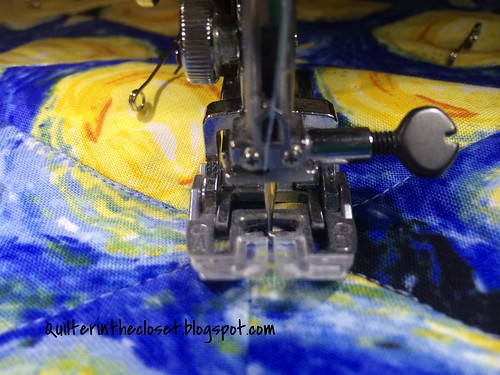
SID isn't rocket science, but it does take some practice.  The basic idea is that you will be using your walking foot and quilting a line of stitches directly into each seam line.

Do you absolutely need a walking foot?

It depends on your machine and your quilt.  The purpose of a walking foot is to evenly feed both the top layers and bottom layers of your quilt together at the same speed.  When you are piecing, two layers of fabric isn't usually very bulky so your feed dogs and regular foot don't have much trouble.  When you have a backing, one or more layers of batting, and then a quilt top sandwiched together, there is more for your machine to deal with.  If you already have a walking foot, I highly recommend using it as it will likely save you some headaches, but I have seen some videos out there where the quilter just uses a regular foot.  I can only guess that their machine must have some really strong feed dogs, and their feet must have a bit more clearance to accommodate for the extra bulk of all the layers -- BUT that would be pure speculation on my part.  I think if I were to use a really thin batting, my machine could probably do it with a regular foot too, but I would have to use more of my muscles to feed it through.  I like to SID with a walking foot.

What kind of thread should I use?

First, pick a color that will blend in with your quilt, if possible.  Multi-colored quilts make this tough sometimes, but do your best.

I like to SID with Superior Threads "Bottom line" thread.  It is a polyester thread, and pretty thin, so it melts into those seams nicely.  If I don't have any Bottom line in the color I want, I just use whatever thread I have that goes.  Sometimes I even mix it up and use Bottom line in the bobbin, and whatever I want in the top.  Crazy!

Where do I start?

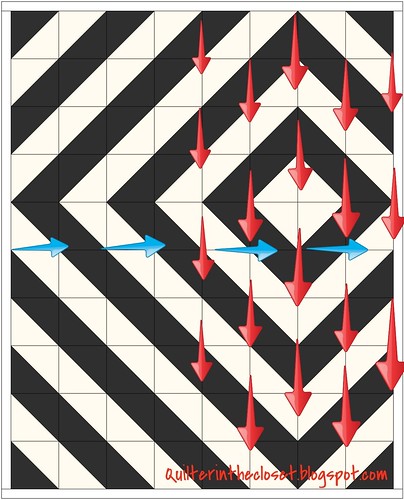
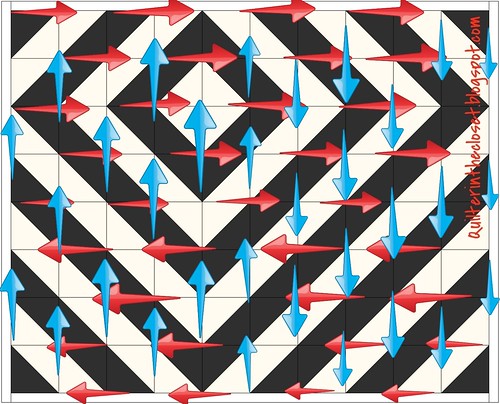
I like to start by securing my middle seams.

SID first steps

I first stitch down my long vertical middle seam (the red arrows).  Then, I turn my quilt 90 degrees and stitch down what would be the horizontal middle seam (the blue arrows).

SID first steps

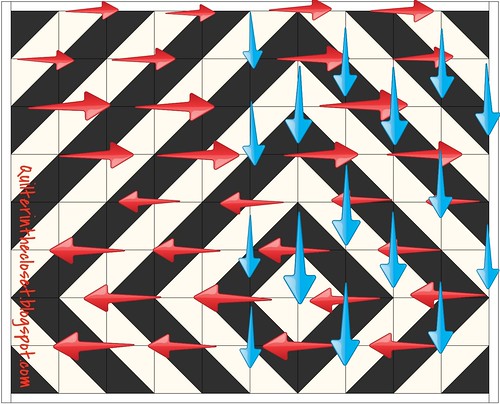
Then I return to my vertical seams and quilt each seam to the right of the middle one in the same direction, cutting my threads at the bottom of each seam, then going back to the top of the quilt to start on the next seam to the right until all the vertical seams to the right of the middle one are quilted.

SID first steps

Next, I turn the quilt 180 degrees and quilt the seams on the other side of the middle vertical seam, all in the same direction, just as I did the other vertical seams.

SID first steps

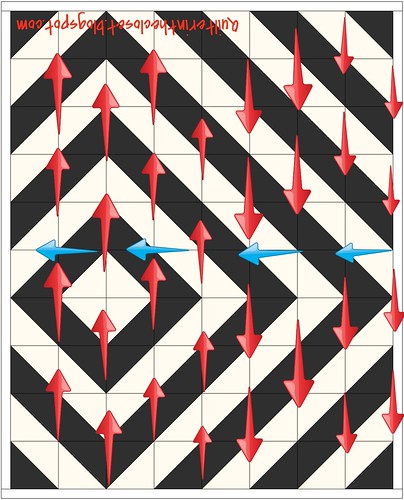
Now I need to secure those horizontal seams.  I turn the quilt to work on the horizontal seams and in the same way I did the vertical seams, I quilt all the seams to the right of the middle horizontal seam.

SID first steps

Then I turn my quilt 180 degrees again, and quilt all the seams on the other side of the middle horizontal seam.

Yes, yes, Jen, but HOW do I actually DO it?

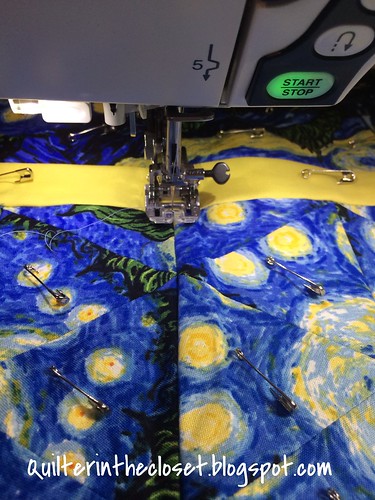
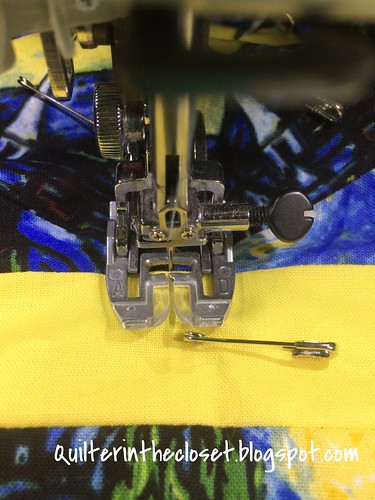
If your seams go all the way to the edge (meaning there is not a long border around the edge of the quilt), then your job just got easier!   Start quilting in the batting about 1/2 inch from the edge of your quilt.

Untitled

As long as you give yourself about a 1/2 inch, you can just start quilting.  You don't need to backstitch at all or bring your bottom thread to the top.  That 1/2 inch will give you enough room on the off chance your bobbin thread makes a little knot or skips a stitch or two before getting going. This part of the batting will be trimmed off later anyway.  Ironically, my machine never has trouble just starting off in the batting.  If I were to just start stitching somewhere in the quilt without bringing my bobbin thread to the top, I would have a mess under the quilt.  Go figure.

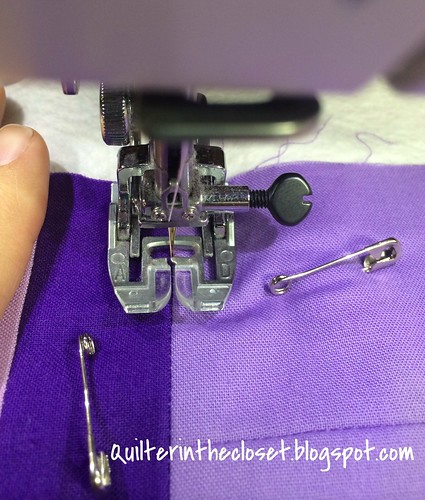
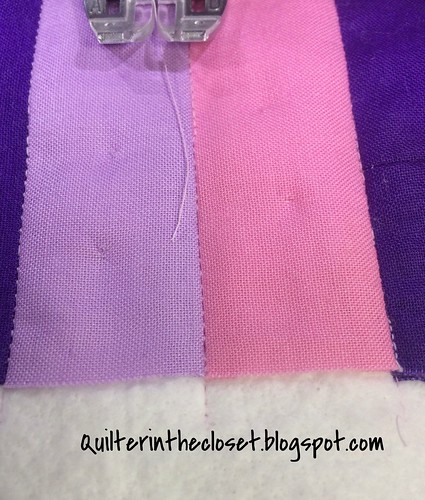
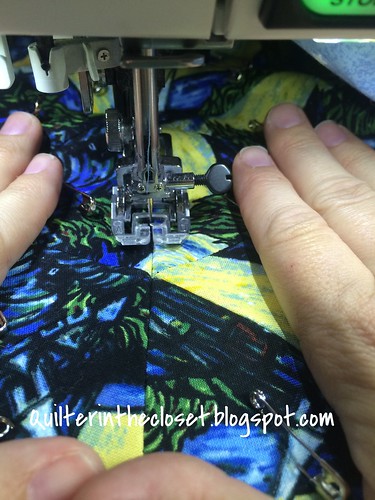
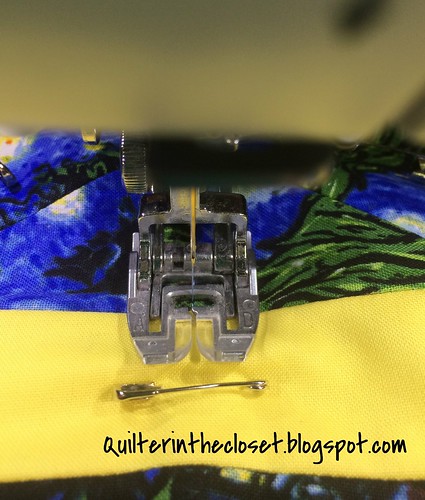
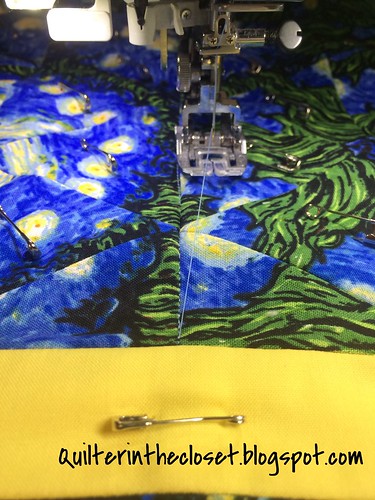
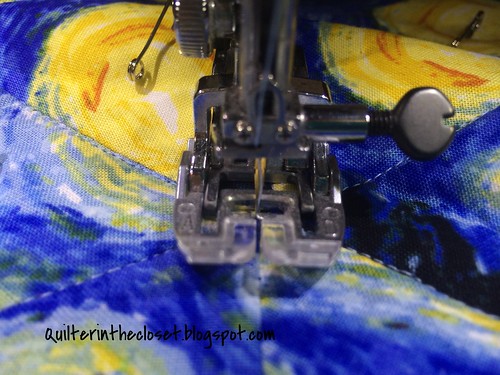
Carefully, and SLOWLY stitch a line of quilting directly in the seam.  I like to focus my eyes on the seam itself not the edge of my foot or the needle going up in down, but instead where I want the needle to enter into the fabric.  I also use my hands to gently spread apart the seam a little.

Untitled

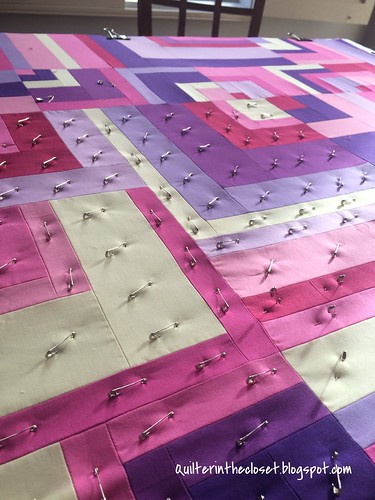
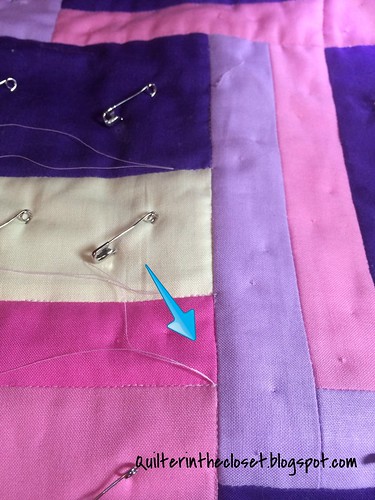
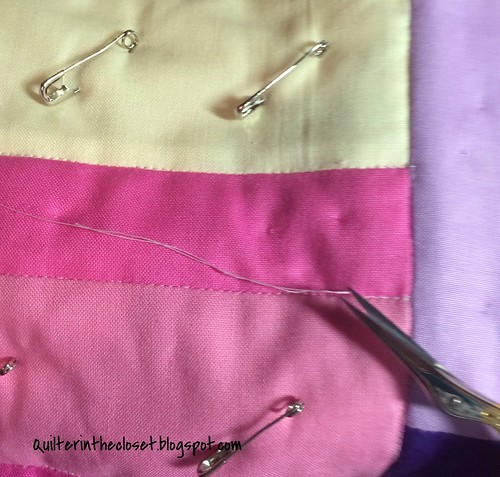
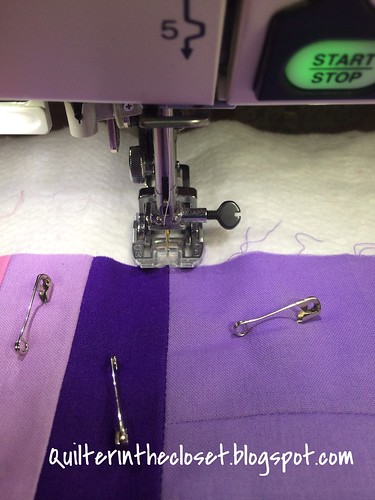
**A quick note about my pins - I remove my safety pins as I go along, but I don't like to get too far ahead of myself.  I only remove any pins that will be in the way of my walking foot up to about 6 inches ahead of where I am stitching.

**It is OK to stop and reposition your hands as you go.  When I first started quilting I thought you had to go fast and keep going.  I've since learned to slow down and that if I STOP to reposition things, I have fewer crooked spots.

Untitled


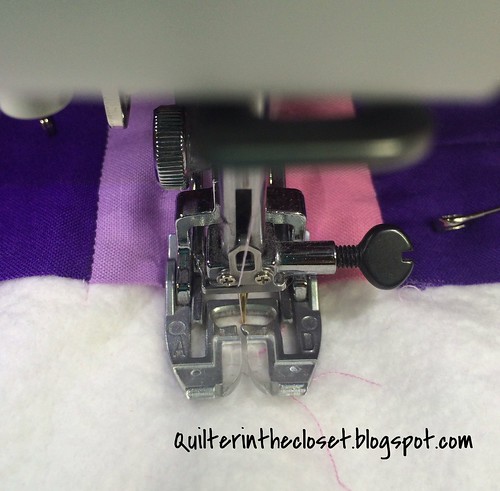
Now stitch all the way to the end of the seam and about 1/2 inch into the batting.  Cut your threads and move on to the next seam.

Untitled

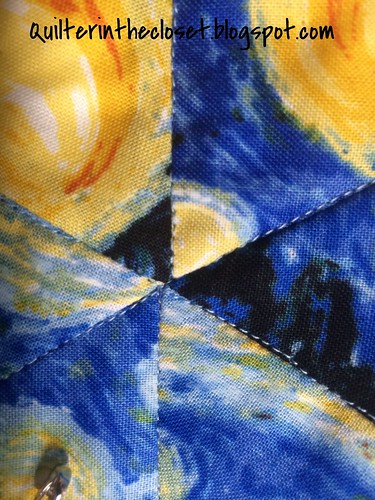
If all has gone well, your stitches will melt right into your seam.

Now, I will admit, no one likes to peddle to the metal as much as I do!  However, even I have learned to slow down a bit when stitching in the ditch.  Even then, I still wiggle from time to time.  DON'T despair if you've wiggled a bit!  And don't rip out your stitches!  If you are using a cotton or cotton blend batting, those wiggles will barely show once you've washed and dried your quilt.

Um, Jen?  What if my seams don't go all the way to the edge of my quilt?  I have a border.

No problem.  I put in a little extra work, but it is easy.

Untitled

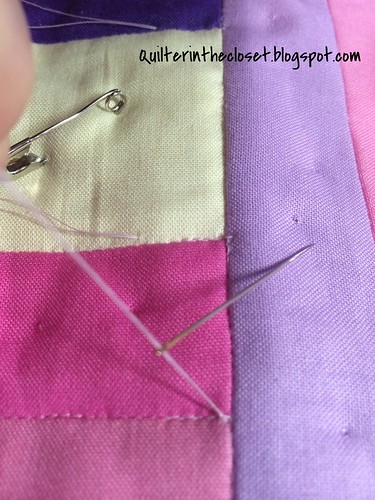
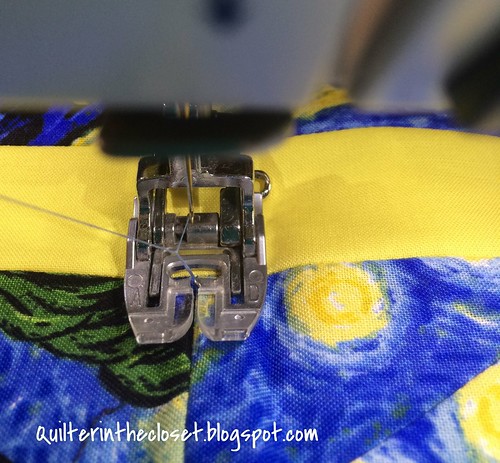
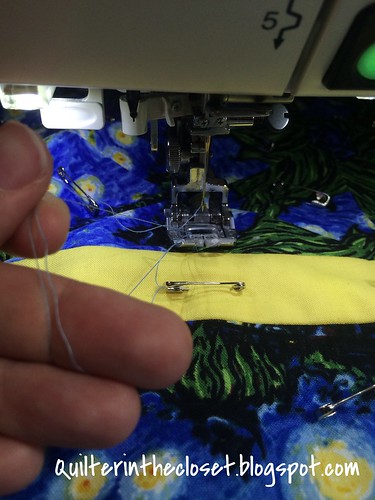
First, find your middle seam, and lower your needle, right where the seam meets the border.

Untitled

Hold on to your top thread, and with your other hand slowly turn you hand wheel/balance wheel, bringing up your needle and the bobbin thread with it.

Untitled

Pull your bobbin thread completely up to the top of your quilt.

Untitled

Now put your needle down, back in the spot where your seam meets your border.

Untitled

Start sewing!  I like to take a few stitches, backstitch, then go on from there.  I also get a few inches away from my starting point and go back and tie a knot in the threads that I just brought to the top of the quilt.  I will bury them later, but if I tie my knot now, I know it is done.

Tying knots, burying threads AND backstitching is a little overkill.  But, I make my quilts to be heavily used.  I don't want my stitching to come apart with frequent washing.  By doing both the knots and backstitching, I can be more assured these stitches will stay in place, and it only takes a couple of extra seconds.

Untitled

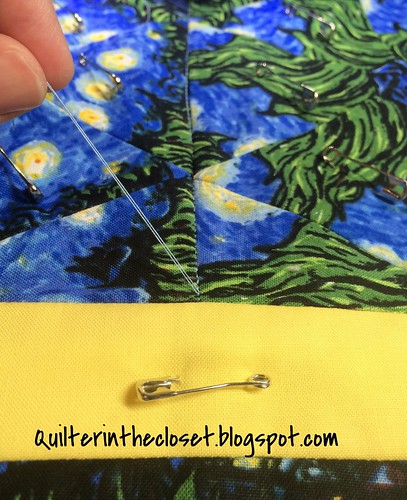
As I mentioned before, I use my hands to gently spread apart the seam the slightest bit to help my needle really get in there.

Untitled

I stitch right to the end of my seam where it meets the border.  I backstitch a couple of stitches and come right back to that spot again.

Untitled

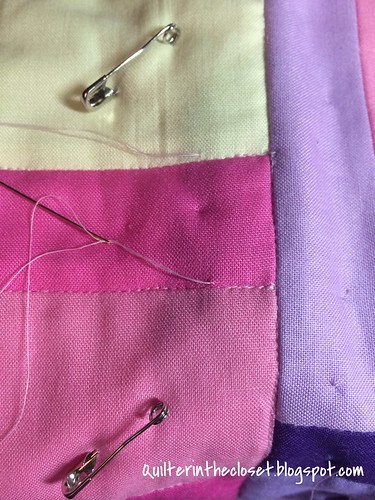
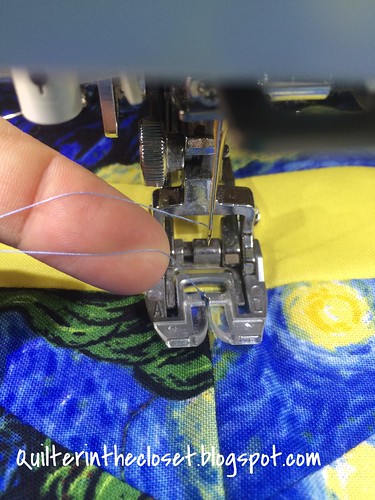
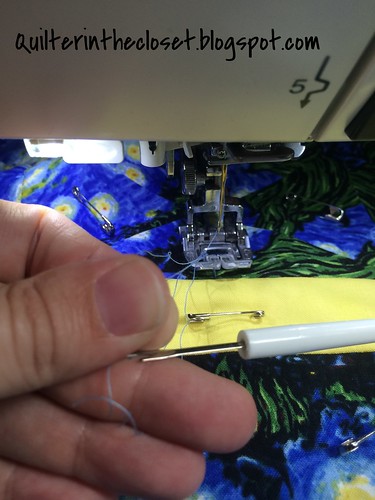
I lift my needle up, presser foot up, and

Untitled

pull the quilt towards me about 6 to 8 inches, exposing about 6 to 8 inches of my top thread (the same is happening with my bobbin thread).

Untitled


Then I go back to the spot I stopped my stitching, put my needle down while holding onto the top thread.

Untitled

I use my hand wheel to put the needle up, bringing up that bobbin thread (just like I did to start my stitching)

Untitled

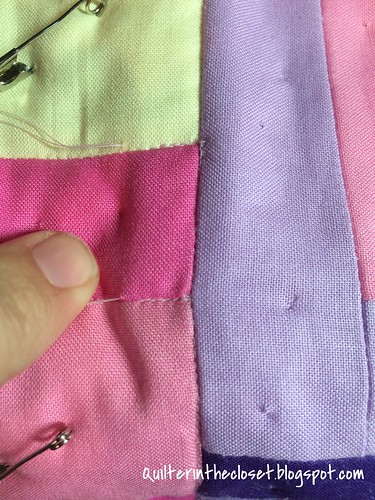
I pull out some of my bobbin thread (remember it is still attached to your bobbin so don't pull thinking you will get to the end of it).  I like to make a little loop by holding both threads with my fingers.

Untitled

Then I use my seam ripper or scissors to cut both threads.

Untitled

I push the quilt away from me again.  The bobbin thread that is still attached to the bobbin pulls back through the quilt, leaving only the threads that ended my stitching.

Untitled

I usually take this opportunity to tie a knot in these threads so I know it is done.  Then I move on to my next seam.

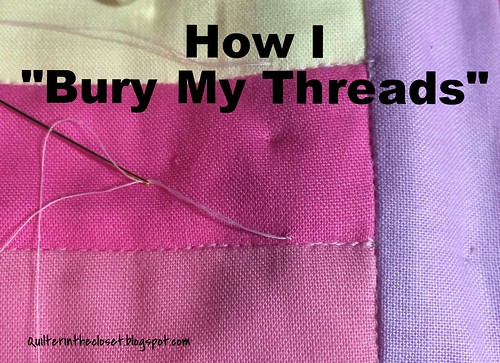
**I will post a quick mini-tutorial by the end of the week how to bury those threads

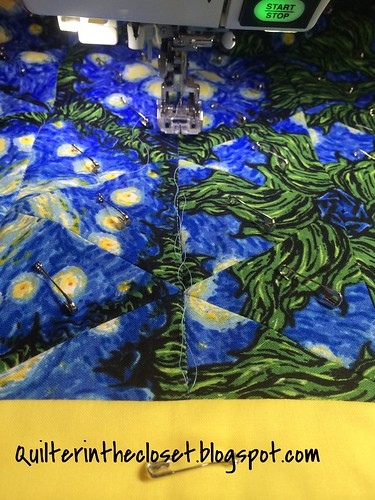
What if my seams aren't all completely straight?

We all piece perfectly right?  All our seams line up like this, right?

Untitled

Well, yours might, but mine definitely don't!

Untitled

You can certainly just stitch down this seam, then swerve over and continue on, OR....

Untitled

Stitch down until you meet the intersecting seam.  Simultaneously, raise your foot (so easy if you have a knee lift), move your quilt slightly, and use your hand wheel to take a stitch horizontally down that intersecting seam.   Depending how far off your seam is, this might only take one stitch or three.  Try to make stitches consistent with the size your machine stitches.  Once you are at the point where your needle is lined up with the rest of your seam, continue stitching as normal (make sure your presser foot is down).

Untitled

The stitches you made on the top will now looks something like this:

Untitled

Yes, you will be able to see that little detour from the back, but really, who is looking that closely?  Plus once I wash it, the quilt is going to be a little wrinkly looking anyway, it will blend right in.

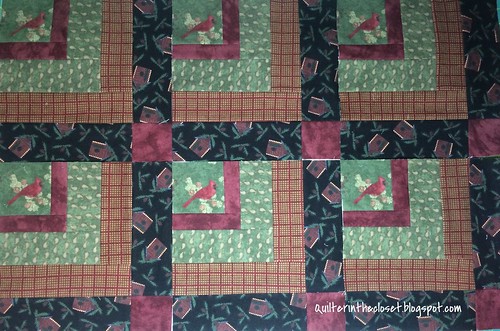
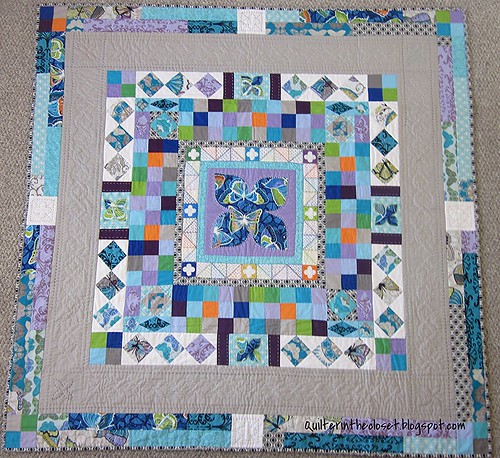
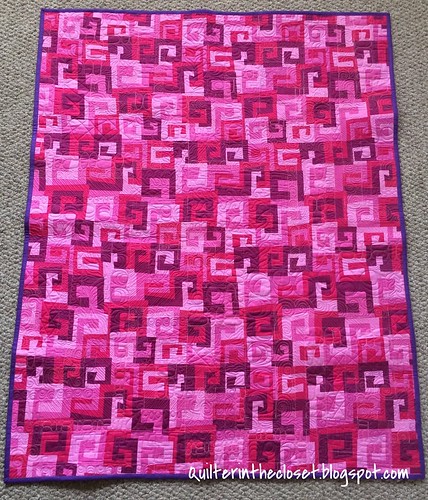
Speaking of, what is my quilt going to look like with just SID?

Well, it is going to look just like you pieced it.  You will see the SID stitches on the back, but SID is meant to blend in with the seams that are already there on your top.  So, if you have a quilt top that you just can't imagine quilting lines over, SID would be a good choice.

I am often stumped how to quilt my quilts.  So, I start with the SID.  Usually, by the time I am finished, I've been looking at the quilt long enough to have some ideas.

Do you advocate SID on every quilt regardless of any other quilting designs might be planned?

I honestly never thought about it until I took Cindy Needham's classes.  She recommends stitching in the ditch for "Every Stinking Seam".   Her reasoning is that SID secures your seams in place where they are supposed to be, meaning that your seams will stay in place exactly where you pieced them to be.  The quilting process tends to shift things around a little bit, but if you secure your seams in place first, your piecing will look crisper.  If you just start quilting, say an all over design, your quilting lines will shift some of your seams in the direction you are stitching, making what should be straight seam lines, curvy.  In the end your piecing looks flawed.

Despite her class samples, I really didn't want to believe it.  At the time, I tried SID on a few quilts, but it took me a while to really discover that Cindy was right.  I think this was in part because I was maybe a little too accepting of the fact that my piecing is never perfect.  I just figured that's the way it is and worried SID would actually show off my missed points, etc.  I didn't know that SID would actually make it look better than it really was because it accentuates the straight lines.
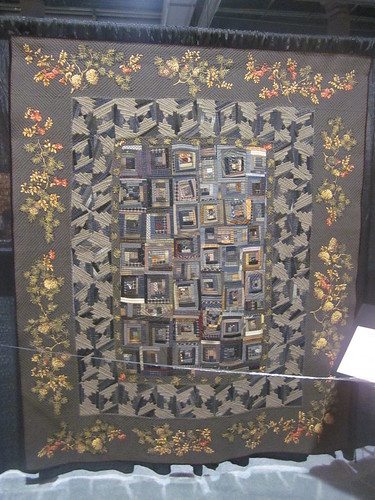
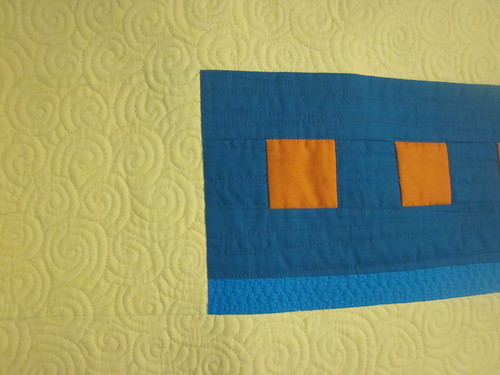
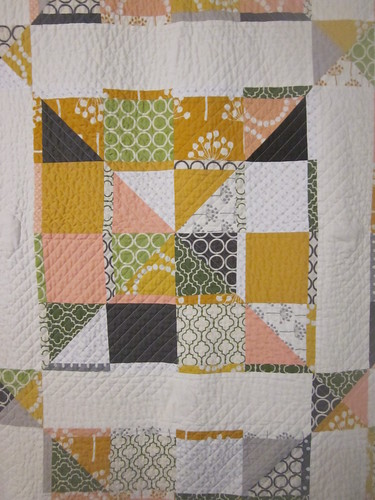
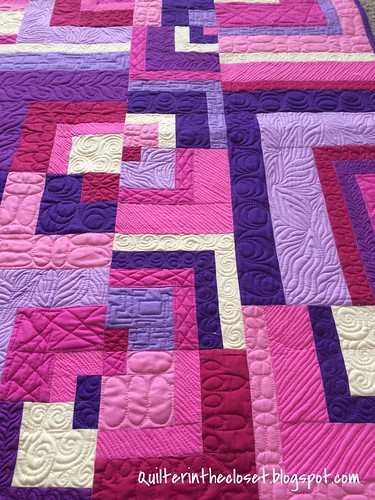
For example......

baby quilt close up

This quilt is not pieced perfectly, but my square edges look sharper because of SID.  If I had not SID'd, and chose to quilt this quilt as heavily as I did, WITH different quilting designs, the edges of some of my squares would have rounded out - simply from the differing amounts of the fabric shifting from design to design.

I now SID all my quilts.  Yep, every one, Nicky!

That's all I have for today.  As I mentioned, I will post a mini-tutorial later this week on how to bury those pesky threads.

How do you do it?  Link up your tutorials here (on this or any other quilting subject).


Rules:

1) NO QUILT POLICE ALLOWED! - if you are making a tutorial, keep it friendly, as if you were teaching your best friend.  If you are visiting a tutorial, please remember that the authors are simply sharing what they have found to work for them.

2) Please link up tutorial from 2014 only.  Feel free to point out any previous tutorial in your new post, but let's try to keep the links current.

3) Visit other linky participants to see how they do it.

4) Did I mention no quilt police allowed?

Thanks for joining me today!

Jen