Showing posts with label holiday crafts. Show all posts

Friday, October 7, 2016

Holiday placemats - a finish Friday

Finally a finish!

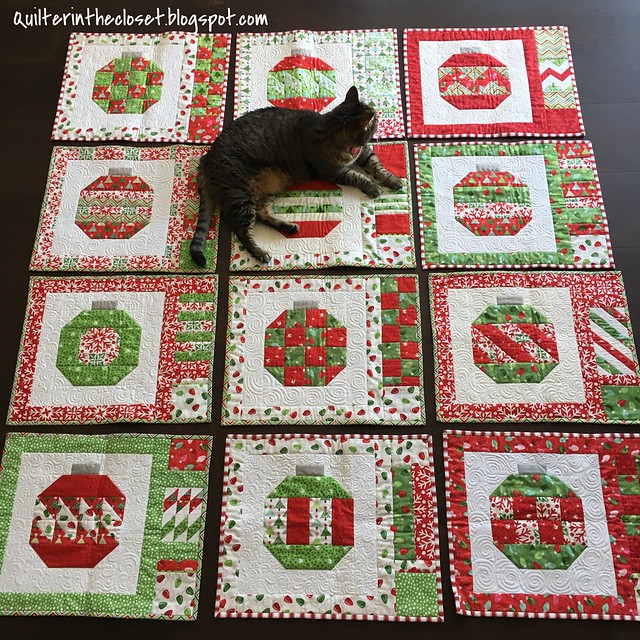
Tookie helping me display my Christmas placemats

I am almost embarrassed to say how long these Christmas placemats have been lingering in my UFO pile.

I first finished some of these ornament blocks way back in 2012 for the Vintage Holiday QAL.  You can see my finished quilt HERE.  I had a bunch of fabric left over so I decided it would be fun to make some holiday placemats with the leftovers.  It turned out that I had plenty - enough for 12 placemats!  I finished all the blocks themselves in December of 2014, and got them all quilted some time in 2015, and was trying to finish up the binding on Christmas Eve (2015).  I didn't realize at the time just how many placemats I had at the time, and I am the world's slowest hand binder, so didn't finish them and they got stored away for another day.  My Lazy Bum group chose this project as my September challenge, and I am happy to finally say that I finished up all the hand binding on these fun placemats.

As you can see, despite not having many finishes to help display, Tookie has not let her skills deteriorate.  She is more willing than ever to sprawl on my work.

Speaking of QAL's: Does anyone have any interest in participating in one after the holidays?  Is there a particular pattern you've been wanting to try in a group?

Thanks for reading today,


Jen


Linking up with:


**This post may contain affiliate links.  If you purchase something after clicking on one of my links, I may be compensated.

Wednesday, September 4, 2013

Candy Corn Table Runner Tutorial


Candy corn table runner
Candy corn table runner is 54 inches long by 13.5 inches wide
This is more of a "How to use your 60 degree triangle ruler" tutorial, but I figured with Halloween just around the corner, I might as well adapt it to fit the holiday.  It's been ages since I've eaten candy corn, but the girls are already spotting it in stores and salivating at the prospect of trick or treating.

Here's what you will need:

Candy corn tutorial strips
  • 2.5 inch x WOF strips - 2 each of white, yellow, and orange
  • 6.5 inch x WOF strips - 2 of purple (or whichever background color you like)
  • 60 degree ruler
  • 16.5 x 57 inch piece of batting
  • 16.5 x 57 inch piece of backing fabric
  • approximately 148 inches of binding fabric (2.5 inch for double fold)
  • rotary cutter, sewing machine, thread, etc.
  • optional border - Three 1.25 inch x WOF strips of purple 

The following directions are for right handed rotary cutting.  My finished table runner was 54 inches long by 13.5 inches wide before binding.

Step One - Make your strip sets

Taking three of your 2.5 inch x WOF strips, sew them together length wise.  The candy corn I spied at the store was yellow on top, orange in the middle and white on the bottom, but it really doesn't matter.  Repeat for you other 3 strips.  Mix up the order if you like.  Your strip sets should measure 6.5 inches wide x WOF.


Step Two - cut 30 degree triangles:

Take one of your purple 6.5 inch strips, folded selvage to selvage, and cut off selvages making sure the edge is square.   Line up your 60 degree ruler with the dotted line left of the center of your ruler.  Also line up the flat tip of the ruler along the top edge of your fabric strip and the bottom edge of your strip should follow the 6.5 inch line across the ruler.  Cut along the angle.  You should now have two 30 degree triangles.

Candy corn tutorial 30 triangle


Why the dotted line to the left?  Think of it this way, you need 1/2 a 60 degree triangle, but you also need 1/4 inch seam allowance too.  So choose the dotted line that will add that seam allowance.

Why do you need a 30 degree triangle?  Well, if you want your sides to be straight, you will either need to add 30 degree triangles on the sides or you will be slicing a little less than half of your 60 degree triangles off into the scrap pile at the end.  I just figure since your strips start with that nice square edge that is perfect for getting some 30 degree triangles, and you have to make a similar cut to start the 60 degree triangles anyway.  It's a win/win.


Step Three - cut 60 degree triangles

Now that you have one angled cut, line up you ruler facing away from you with the 6.5 inch line across the top of your strip, and the blunt end of the triangle on the bottom of your strip.  Cut the new angle.  Because your strip is folded, you are cutting two 60 degree triangles at a time.

Candy corn tutorial 60 degree triangle

Now rotate your ruler around to face you, lining up the 6.5 inch lines and blunt tips, and cut again.  Continue rotating your ruler around until you are near the end of your strip.

Candy corn tutorial 60 x 2

At this point, you can either open the fold and cut one more 60 degree triangle, or line up the dotted line to the left of center again on the ANGLED cut.  The blunt tip of the ruler should be in line with the top edge of your strip.  Cut along the angled portion of the ruler, noting that it is actually cutting a perpendicular cut, making a 30 degree triangle. 

Candy corn tutorial 30 x 2

Step Four - repeating cutting with your strip sets.

Now take your strip sets (yellow, orange and white).  You can fold them in half lengthwise, lining up the seams, and make your cuts, but I find that my cutting gets a little messy at some point.  

Candy corn tutorial 30 degree strip

Start with your 30 degree triangle at the end, then continue with your 60 degree triangles until you reach the end of your strip.  If you have room at the end, it never hurts to get one more 30 degree triangle out of the other end.

Candy corn tutorial 60 degree strip

Repeat for your second strip set.

Step Five - Play around with possible layouts

Candy corn design wall

These triangles you have cut can make all kinds of fun designs.  For the table runner, I chose the 1000 Pyramid design, but if you would rather have a wall hanging, try some hexagons.

Candy corn hexagon


Here's a picture of how half of the hexagon would be pieced together (see all those blunt tips together).  You would then add a background triangle to either side.  Notice how it is forming a straight row?  For those of you doing the One Block Wonder Quilt Along, this is essentially how we will be making hexagons.

Candy corn half hexagon

You can even mix up the hexagons, though I thought this reminded me a little too much of a radiation warning sign.

Candy corn all mixed up

These are just some of the things you do with the triangles you cut.  You can also use the ruler to make diamonds, and combine them with triangles to make lovely stars.  Sarah Fielke's "Big Techniques from Small Scraps" Craftsy Class has a whole segment on this ruler.

Step Six - start piecing in rows

After you have chosen your final layout, start piecing the triangles together, lining up the edges.  You will want to start and finish each row with a 30 degree triangle.  This gives us nice straight edges along the sides of your quilt.  For the table runner, I pieced fourteen 60 degree triangles and two 30 degree triangles in each row, alternating between my candy corn and the purple background triangles.  For my second row, I started with the opposite (candy corn or purple) than my 1st row started with.

Piecing tips:  The blunt tip on the end of the ruler will show you where your seam allowance should start.  

Candy corn tutorial tips

Just remember as you add more triangles to your row, one edge will always line up straight across.

I didn't feel the need to press as I went.  I just sort of finger pressed toward the dark background triangles since they were darker.  Once my row was together, I pressed the seams to reinforce that direction.

Once you have your rows completed, sew them together.

Candy corn tutorial table runner

Step Seven - finishing

If you desire, add a border.  Mine is only 3/4 inch wide.  Then baste together with the batting and backing, quilt as desired and bind.

Candy corn table runner closer

I chose to just stitch in the ditch for my table runner.  This decision had more to do with time than anything else.  I thought a fun loop-de-loop with a bat motif mixed in here or there might be fun.  My personal preference would be to keep the candy corn unobstructed with a design, but those purple background triangles are screaming out for something fun.  Maybe I'll go back later and add something in those spots.

This pattern could also be adapted to make Christmas trees, especially if you added a sashing between rows with some squares to be the trunks of the trees.  Just a thought! 

Candy corn mug rugs

I did have several triangles left over, and made these little candy corn mug rugs.  They are really closer to over-sized coasters, but they are cute.  Anybody want one?  Just leave me a comment telling me what is your favorite Halloween treat.  I will draw two winners this Friday, September 6th and they will each get one little coaster/mug rug.  This giveaway is open internationally.

This giveaway is now closed.

Thanks for reading today,

Jen


Friday, December 28, 2012

100 Day Hustle finale

Time for a 100 Day Hustle recap!

100 day hustle

1. Lizzy teacher gift, 2. Ashley teacher gift, 3. Vintage Holiday front, 4. IMG_1673, 5. Olivia's Quilt front, 6. The Grinch, 7. Totally Groovy, 8. Groovy back, 9. mosaicc622aaa0d425fe2aca04436e06c45899b21bb454, 10. Hurricane Blocks, 11. Leaf table runner, 12. sashiko coasters, 13. 3 x 6 solids mosaic, 14. preschool pillowcases, 15. sept star of africa, 16. Batik stripe in focus

Here is my list:
  • 12  Bee blocks for the 3 x 6 Bee DONE 
  • 3 blocks for the Star of Africa bee - 1 1/2 DONE - The Grinch needs a little more work, and I now have 2 more to do to get me through January.
  • At least 1 block for the Leafs Me Happy Blog Hop - DONE
  • Pillowcases for my daughter's preschool - DONE
  • Finish Totally Groovy - DONE
  • Quilt the Batik Stripe quilt - DONE
  • small gifties for a few of my bee mates 
  • Another small gift for my daughters' teachers (2) - DONE
  • The Sashiko coasters - DONE 
  • finish the Vintage Holiday QAL top- DONE
  • Finish Olivia's applique quilt - DONE
Added:
  • Hurricane Sandy Blocks - DONE
  • Christmas decorations - DONE
So, not too shabby, right?  I really wish I had gotten some little gifties out for my bee mates, not to mention finished up the blocks that are due.  I suppose that not getting them done gives me the opportunity to send little surprises to them randomly in the New Year.

I really enjoyed doing the "Hustle" this year.  Just making a list and trying to figure out what was realistically going to get done, really helped me focus.  And of course, having others sharing their lists and triumphs motivated me to do the same.  I will definitely be participating again next year.

How did you do with your 2012 finale?

Jen

Kelsey Sews

Monday, December 10, 2012

Tree and Ornament Wall Art Tutorial

A little tutorial for the Holiday Season!  I've had it in my mind to make this Reversible Applique Wall Art for months.
Tree and Ornament Wall Art
Warning!  This is the "lazy gal's" way of doing reverse applique. If you are familiar with reverse applique and use freezer paper or another method all together, feel free to adapt!

What you will need:
  • 2 canvases (I used 8 x 10)
  • 2 pieces of paper the same size as your canvas
  • 2 pieces of background fabric at least 2 inches bigger than the dimensions of your canvas (so mine was 10 x 12), (make sure 2 inches is enough to allow for the thickness of your canvas, mine was pretty thin)
  • Various scraps of red and green fabrics
  • Lite Steam a Seam 2 Fusible Tape - I used the 1/2 inch variety.
  • Thread
  • Scissors
  • Pearl cotton or embroidery floss (optional)
  • Stapler
Step One: Preparing your templates.

Rather than give you templates, I will show you how simply I made mine.  This way you can adapt your project to whatever size canvas you like (or perhaps another project entirely).

For the Tree:

tree template

Fold your paper in half.  Draw half a tree, cut out.  See, I told you it was simple!  Double check to make sure your tree fits nicely on your canvas.

For the ornaments:

ornament template

Grab a few round objects and trace.  For the round ornament, I used a cup.  For the oblong ornament, I traced around a cap, drew a line through the center the length I wanted my final ornament to be, folded on the line, then cut my shape.  Again, place your paper templates on the canvas to make sure you like how they fit.

Step Two: Preparing your background fabric.

IMG_1607

Take your templates and trace their shapes on the wrong side of your background fabric, in the position you want them.  I wanted my tree to be centered.  Remember for the ornaments, this would be the mirror image.

IMG_1608

TIP: I also marked the edges of my canvas on the background fabric, just to give me an idea of where they were so I could more easily center my objects.

IMG_1615IMG_1614

Next take your fusible tape and place as close to the line you marked as possible.  You can leave some gaps here and there (curves are tricky, after all).  Then remove one side (the bottom side) of the paper and iron in place.

IMG_1616

Now take your scissors and cut approximately 1/4 inch from the line on the inside of your shapes.

IMG_1617IMG_1618

You will also want to carefully snip inside any corners, almost to your drawn line (about 1/8 inch away), and along any concave curves (the circle ornament and the bottom of the tree in my case).

IMG_1625

Now finger press all those seams.

points

Now is a good time to prepare the points too.  Finger press them by first folding in the point, then folding each "side around it, until it is sharp.  It is OK that this doesn't stay put.  You are just trying to give the fabric an idea of where it will be going soon.

IMG_1625IMG_1628

Now, remove the 2nd piece of paper of your tape and CAREFULLY fuse your new seam allowance to the remaining side of the tape.  ****If you used the 1/2 inch tape, as I did, there will be some extra fusible goo.  This will be handy for the next step, but if you press your iron against it now it is going to make a mess!  So be careful, use the tip of your iron and work from the inside of your shapes.  IF you are lucky enough to have one of those Clover mini irons, this is an excellent use for it!

IMG_1629

If you were rather generous with your seam allowance, or if you used 1/4 inch tape.  Now is a good time to add a little extra tape around the edges of your shapes.  You don't have to go crazy with it, but a little extra might be nice.

Put your background fabrics aside for a moment.

Step Three - Preparing the "insides" of your tree and ornaments

IMG_1609
You will notice, I am really thin on the green scraps!
Take those scraps, and sew them together however you like!  Really, however you like.

IMG_1610

They just need to be big enough to cover your templates PLUS 1/2 inch all around.  I was a little more generous.

For my tree I took squares of the same width, strung them together, then added them to strips of squares that were different in width.  For my oblong ornament, I just did strips.  For my round ornament, I did go a little crazy and make a mini star block (but I'm not sure I'll ever be that crazy again).

Now here is where that extra fusible tape will come in handy!

Step Four: Joining the insides with the background

IMG_1630

Take your "insides" and place them on your background.  ****The right side of you "insides" will be against the wrong side of your background piece.****  Make sure it is centered in your hole of the background, remove any paper from any additional tape you added, then iron from the backside, fusing all the fabric together. Do this for all your pieces.

IMG_1631

When you are finished. They should look something like the picture above from the front.  The fusible tape will hold everything together so you can stitch them together.

Step Five - Stitching them together

IMG_1668

Next, you need to stitch the fabrics together.  You could machine applique them if you choose.  I decided to do mine by hand.  I used a blind stitch for the ornaments with regular white hand quilting thread, and I used a BIG blanket stitch for the tree using size 8 pearl cotton in a green (in the hope it will look like pine needles).

I also added some running stitches to the ornaments, and backstitched a "thread" which my ornaments hang from.  I considered adding some red running stitches to my tree, but I decided I actually like it just the way it was.

You could get pretty fancy adding beads and other embellishments at this point!

IMG_1672
Now you can really see the quality (or lack of) in my stitching!
TIP - If you used a white background, like I did for my ornaments, you may want to trim the back of your fabric to approximately 1/4 inch near your stitching so that as little fabric shows from the front.  I didn't bother doing this with my tree because the red fabric hid the shadow of the green fabric.

Make sure you press everything well before moving on to the next step.

Step Six - Adding your work to the canvas

This part is extremely easy!  You just staple it!  I suppose you could also glue it down, but I had it in my mind that I might want to re-use these canvases for other holiday creations.  Staples are easily removed and would allow me to do that!

IMG_1669

Laying my fabric wrong side up, I centered my canvas on top (also wrong side up), then stapled along the edges.

IMG_1670IMG_1671

At the corners, I folded one side in as much as possible, then folded the other side up and over - much like the edges of binding - then stapled them in place.

Step Seven - Finally, hang your art on the wall!


Tree and Ornament Wall Art

If wall art isn't your thing, the same steps could be used to make cute reversible applique pillows!  Add a bobble, make it square, quilt around it, and it would make an adorable holiday pillow.

I hope you enjoyed this tutorial!  I hope you join me for Building Blocks Tuesday tomorrow.

Thanks for reading,

Jen