
This is going to be a really short post with some quilting tips for your OBW quilts.
There are really only two things I want to emphasize:
- Stitch in the Ditch
- Keep it Simple
Stitch in the Ditch or "SID"
If you have taken a free motion quilting class from Cindy Needham, you know that she recommends Stitching "Every Stinking Seam" in the Ditch. In her classes, she shows examples of virtually identical quilts with one stitched in the ditch before adding additional quilting, and one that did not have the benefit of "SID". The SIDed quilts always look better. This is because the seam lines have been secured in place by the SID. If you don't take the time to do the SID, your seams can stray from their places during the quilting process, making your piecing look imperfect even if it was perfect to start with.
Said a different way - we all know that the quilting process causes some shifting. This shifting is why we typically have the batting and backing be larger than the quilt top itself, right? Well, as you push and pull the quilt sandwich around to quilt your quilting design on it, it pushes and pulls the fabric out of alignment a tad. This can make perfectly straight seams, bend a tad here and there. If you SID all your seams first, they will be secured in place, in the perfectly straight line that you want them in.
Admittedly, I don't SID every one of my quilts. I have to weigh the benefits vs. the time involved to perform the SID, and of course, the quilting design, and the design of the top come into play as well. Our quilt's pattern is all straight lines, which should make the SIDing easy; however, there are a lot of them, which will take some time.
The most important reason I recommend SIDing this quilt has to do with the bulk in the seams. Even if you have done an impeccable job pressing all those seams open to distribute the bulk, there will be some bulky spots where six seams unite at the centers and edges of some of your hexagons. This is unavoidable to some extent. However, if you SID the quilt, every stinking seam, these spots will be anchored down and less bulky in your finished quilt.
I did not do SID for my blue & white OBW, and I think I paid dearly for it. I had what I described in my "lessons learned" post as "nipples" where the seams were bulky. Trust me folks, you want your beautiful quilt to be nipple free. They are just awkward feeling.
Keep it Simple
If you choose to do more than just SID your quilt, make sure you keep the quilting design simple. Your kaleidoscopes already have a lot going on, fancy quilting will only disappear, or detract from the beauty of your quilt top. So keep it simple with an easy all over pattern, like a stipple or leaves.
If you really want something different, maybe try some lines to accentuate the swirling of the kaleidoscopes.

This quilt top might also be a fun time to try something like a radiating circle across the entire top. This can be accomplished with a walking foot (a bonus in my book). Actually, Petit Designs had a series with a whole bunch of designs that could be done with a walking foot. Many of them are simple enough to suit this quilt. Check them out HERE.
I hope you are having fun. I've been working on something else at the moment, but am anxious to piece together my top and get it quilted soon.
**UPDATED - Here is a picture of my finished quilt top....
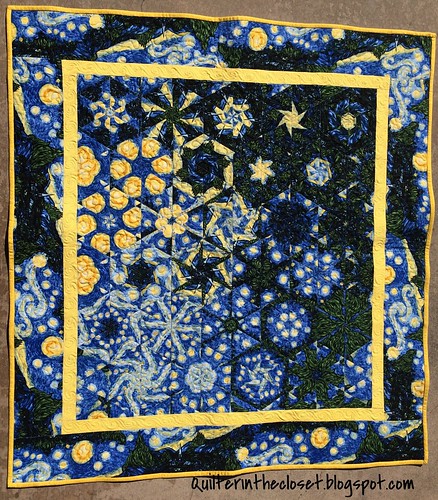
I am so happy that I stitched in the ditch for every seam. It made the rest of the quilting so much easier. I choose to just do a simple stipple/meander with the exception of the yellow border.
The linky opens next Thursday, so you can show off your quilt tops. Remember, you just have to have the quilt top completed, it does not need to be fully quilted!
Thanks for reading today,
Jen
The most important reason I recommend SIDing this quilt has to do with the bulk in the seams. Even if you have done an impeccable job pressing all those seams open to distribute the bulk, there will be some bulky spots where six seams unite at the centers and edges of some of your hexagons. This is unavoidable to some extent. However, if you SID the quilt, every stinking seam, these spots will be anchored down and less bulky in your finished quilt.
I did not do SID for my blue & white OBW, and I think I paid dearly for it. I had what I described in my "lessons learned" post as "nipples" where the seams were bulky. Trust me folks, you want your beautiful quilt to be nipple free. They are just awkward feeling.
Keep it Simple
If you choose to do more than just SID your quilt, make sure you keep the quilting design simple. Your kaleidoscopes already have a lot going on, fancy quilting will only disappear, or detract from the beauty of your quilt top. So keep it simple with an easy all over pattern, like a stipple or leaves.
If you really want something different, maybe try some lines to accentuate the swirling of the kaleidoscopes.

This quilt top might also be a fun time to try something like a radiating circle across the entire top. This can be accomplished with a walking foot (a bonus in my book). Actually, Petit Designs had a series with a whole bunch of designs that could be done with a walking foot. Many of them are simple enough to suit this quilt. Check them out HERE.
I hope you are having fun. I've been working on something else at the moment, but am anxious to piece together my top and get it quilted soon.
**UPDATED - Here is a picture of my finished quilt top....
I am so happy that I stitched in the ditch for every seam. It made the rest of the quilting so much easier. I choose to just do a simple stipple/meander with the exception of the yellow border.
The linky opens next Thursday, so you can show off your quilt tops. Remember, you just have to have the quilt top completed, it does not need to be fully quilted!
Thanks for reading today,
Jen
Yikes, I didn't realize the linky was so quickly approaching!!!!
ReplyDeleteAfter seeing your last post about choosing fabrics I purchased the ebook from amazon. I am going to buy some Christmas material to try it out. Could you please help me and other interested souls by going thru the lining it up and cutting it out. Your instructions have been very helpful and I am afraid I am having a hard time following the book.
ReplyDeleteHeartfelt advice there Jen!
ReplyDeleteWOW, the flickr group is looking great!
ReplyDelete