Showing posts with label We Bee Learning Bee. Show all posts

Tuesday, June 25, 2013

Granny Square Goodness - Building Blocks Tuesday


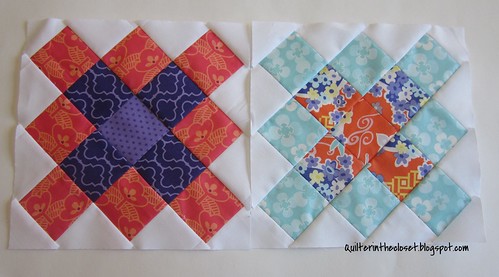
We Bee Learning Granny Squares

I finally got to try out Granny Squares!  The Queen Bee for the We Be Learning Bee for June wanted these fun blocks in bright colors.  We used the tutorial here at Blue Elephant Stitches using 2.5 inch squares.  I had a few leftover squares of Good Fortune from the Gigantor quilt, so I made the one on the right, but then struggled picking fabrics for the other.  Orange is still bright in my book, but what to pair it with....I obviously ended up with purple and I assure you those purples are a little brighter in person.

I recently folded up my stash of Flea Market Fancy.  I originally thought a granny square quilt with those fabrics would be great, and folding them up made me think so even more.  So don't be surprised if you finally see me cut into my FMF this fall and do a little more granny square action.

So what have you been working on this week?  I want to know!

Link up your fabulous blocks.  You put a lot of hard work into them - show them off!  This free linky will stay open for a whole week.  And spread the word!


Quilter in the Closet

Rules:

1) Please link up only to the page in your blog showing your wonderful blocks, not just the blog homepage.  Flickr pictures are also OK.
2) Make sure to put your blog name as the description so people know where they are going or the name of your block!
3) Please grab my button and post it in your blog post or sidebar.
4) Visit other linky participants!

Thanks for reading!

Jen


Monday, June 3, 2013

To each their own - Building Blocks Tuesday (the early edition)

The Early Edition, since I will be a stop on tomorrow's "Say it With Flowers" Blog Hop.  I hope you will pop in to say hello.

Anyhoo... I never did showcase the wonky pinwheels I made for the We Bee Learning Bee in May.  Here they are:


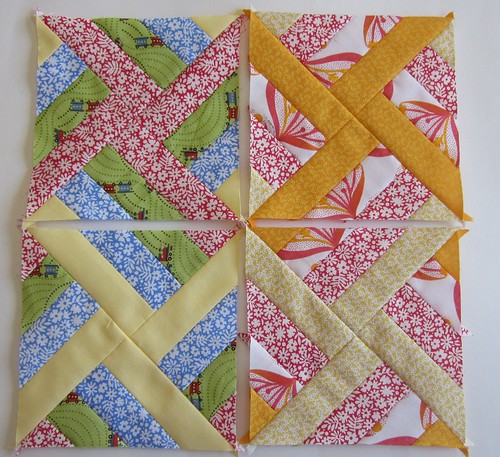
We Bee Learning May

The Queen Bee for the month asked for "bright and cheery", and I'm not sure I accomplished that.  That cheddar sure is bright, and I think the red floral is cheery, but I'm not sure about the rest.  I hope she liked them in the end.

I must admit I didn't enjoy the construction process on this one.  You make a set of strips, cut them into squares, then cut them on the diagonal.  I still have trouble sewing skinny strips together, then when you cut on the diagonal and all those bias edges are on the exterior of the block - whew!  Mine all came out to size, but I am glad I am not the one sewing them together from this point.  To each their own!!

So what have you been working on this week?  I want to know!

Link up your fabulous blocks.  You put a lot of hard work into them - show them off!  This free linky will stay open for a whole week.  And spread the word!


Quilter in the Closet

Rules:

1) Please link up only to the page in your blog showing your wonderful blocks, not just the blog homepage.  Flickr pictures are also OK.
2) Make sure to put your blog name as the description so people know where they are going or the name of your block!
3) Please grab my button and post it in your blog post or sidebar.
4) Visit other linky participants!


Thanks for reading!

Jen


Tuesday, April 16, 2013

Spring Cleaning, the Toy Witch, and Floating Hearts - Building Blocks Tuesday

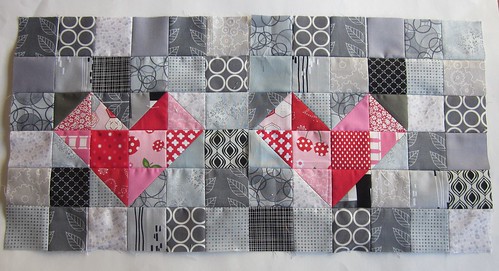
Aren't these blocks adorable?  They are called "Floating Hearts", and I made them this week for Christine in the We Bee Learning bee.

We Bee Learning April

I got to choose where my hearts would end up in the block.  I didn't really mean for them to be so similar, but I'm sure they will be placed far apart from one another.  The quilt she is making has these grey blocks with floating red/pink hearts, with the exception of one block which is pink/red with a grey/black heart.  It looks really cool.  I hope she shares the finished quilt with us.  I would love to see how she quilts it too.

In other, non-quilty, going's on...

Yes, the dreaded words, "spring cleaning".   I put it off long enough, but it has been happening around here this week.  I probably would have put it off until next spring (or whenever we move) had it not been for the Girl Scouts at Ashley's school having a toy drive.   This is not just any toy drive.  They are willing to take used toys, even broken toys!  Evidently, Los Angeles has a rather large toy bank, so they use parts from other toys, fix them up, make them like new and give them to kids who need toys.  Brilliant!  And with 3 crazy little girls in the house, we had a lot of nearly complete toys that no one plays with and the second hand store isn't interested in.   So yesterday, I dumped out all the toy boxes, cleaned out all the closets and tried to put together as many sets of tea dishes and blocks, etc. as I could, not to mention the dozen completely new (with tags still on) Easter bunnies that various relatives have given us the last couple of years.  They all went in several large trash bags and made it to the bin at the school.  And I'm not even done yet!  There are still a few boxes that the Toy Witch put away in storage to go through.

Who is the Toy Witch, you ask?  She is a mysterious person who comes while the kids are at school - according to legend if she is looked by a child straight in the eye, she might turn to stone - and takes whatever toys are not put away properly.  What does she do with these toys?  Well, she used to throw them away (into storage), but now according to the International Treaty of 2011, she has to donate these toys to needy children who will take better care of them.  Another random detail (because kids believe in her more when there are details), she may or may not be related to the tooth fairy, in an evil stepsister kind of way.  Does her existence help my kids put away their toys?  Probably, yes.  They are smart enough to know which days she is expected to come. So if it is Saturday, those toys are still going to be all over the floor.  But in general, it has helped.

I hope you will come back tomorrow to visit during my day of the April Showers Mug Rug Blog Hop.  I have a few creations to share!  There are also some fabulous creations on today's blog hop stops:


TUESDAY, APRIL 16th
Cathi @ Quilt Obsession
Jane @ Jane's Fabrics and Quilts
Heidi @ Nutz4Redwork
Cherry @ Cherry'sPrairiePrimatives
Christine @ Quilt Monster in my Closet
Vickie @ More Stars in Comanche
Pauline @ Stekje
Jan @ Jan's Art Friendzy
Nissa @ Nissa Made Stuff
Robin @ As Sweet As Peaches
Lyndsey @ Sew Many Yarns
And a guest post by Eleni located at Sew at Home Mummy


So what have you been working on this week?

Link up your fabulous blocks.  You put a lot of hard work into them - show them off!  This free linky will stay open for a whole week.  And spread the word!


Quilter in the Closet

Rules:

1) Please link up only to the page in your blog showing your wonderful blocks, not just the blog homepage.  Flickr pictures are also OK.
2) Make sure to put your blog name as the description so people know where they are going or the name of your block!
3) Please grab my button and post it in your blog post or sidebar.
4) Visit other linky participants!


Thanks for reading!  I'm off to pack up some more toys!

Jen


Wednesday, March 20, 2013

Now spinning the right way - WIP Wednesday

Thanks to a couple of sick kids and a disaster of a house, I have nothing new to show you this week and made little progress from last week's list.  HOWEVER, I have made progress on some of my general quilty goals for the year!

I finally made it to a meeting of the Los Angeles Modern Quilt Guild earlier in the month.  I had pretty high expectations, and I wasn't disappointed.  First, there must have been at least 65 people there that night - standing room only!  It was fun to see so many diverse people in the room, and learning that there quilt styles were just as diverse was wonderful.  I also got to see them wrap up / show the final projects from the Madrona Road Challenge.  People made all sorts of beautiful stuff.  From mug rugs, to full size bed-quilts, bags, pillows, even a laminated mat to go under the kid's car seat to protect your upholstery.  So many creative patterns and uses for that line of fabric.  It was very inspirational.  I also heard from several members that attended QuiltCon and their take on the experience.  It made me really want to go to the next QuiltCon!  I hope I can make it back to another meeting soon to see what else is new.

I also started to organize my scraps.  No more overflowing brown paper bags.  I say "started" because even though I now have them organized by color, I was hoping to pull out lower quality fabrics for Ashley, and cut them to useful sizes for her.  I have only gotten as far as sorting them by color - but it is a start!

Also!  A couple of Friday's ago, I took a tour of RJR Fabrics!  My Dear Husband set this up - isn't he the best?  It turns out, their facility is right around the corner from me.  I am still writing up my post about the experience, but I hope you check back on Friday to hear about the best blind date EVER!


This Wednesday...

Completed Projects:
  • Bee Blocks - We Bee Learning blocks - done and redone (now spinning the right way), Make it Modern blocks - all done, March Lucky Star block - done!
  • Now spinning the right way

On-going Projects:

AKA - "stuff I plan to touch this week or next".
  • Bee Blocks & BOM blocks - Skill Builder BOM blocks (now 2 months worth), April's Simply Solids stuff came in the mail this week too.  And do I dare start the Forest QAL?  It looks so fun.
  • Star of Africa Bee - February's block still needs to be done, and we just found out the March theme
  • Curves Class goodies - catch up in progress, but on hold for now
  • Les Amis Baby quilt - quilting in progress, was put aside for curves week, but it is time to get going on the quilting.
  • Baby quilt in blue - fabrics chosen.  Must decide on a design soon.  I would like to do a interlocking square type pattern, but simple chevrons might be more appreciated by the mom.
  • Discontinuity 2 - top is complete using the log cabin method.
  • April Showers Mug Rug - Started!
  • Easter baskets - I want to make a few of Noodlehead's Divided baskets for the girls' goodies, but I am not sure I will have time.

Back Burner:

These will likely be touched in a couple of weeks - I know I've been saying that for more than a couple of weeks.
  • Handstitched Medallion Quilt - quilting in progress.  This is the project I pull out whenever we go up to the mountains for the weekend.  I usually only get a few threads more done, but it is a nice project to do in front of the fireplace while the girls are watching movies.
  • Beginner Quilt Along at Quilting Gallery - PROGRESS!  I have put the sashing on!  Hey, it is something in the right direction.
  • Charity quilt for the guild - not started.   
This week's stats:
Completed projects - just blocks
New projects - 0
Currently in Progress - 8 +

Don't forget to link up any blocks you have been working on to the Building Blocks Tuesday post!

And as always, thanks for reading,

Jen

Quilter in the Closet

I am not linking up today.

Monday, March 18, 2013

Maybe it is a hemisphere thing? - Building Blocks Tuesday

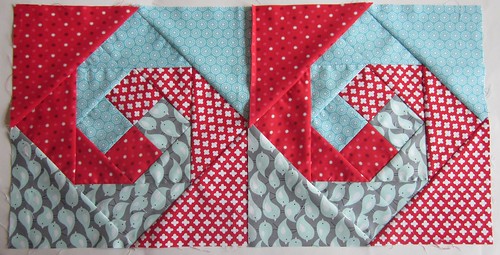
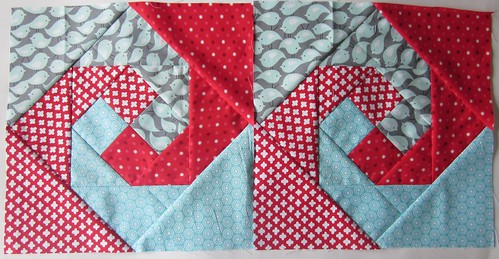
Have you ever tried to make excuses for yourself just not paying attention?  Take a look at this snail trail block for Hayley (Mrs. Pickles Garden) in the We Bee Learning Bee.

We Bee Learning March

Looks OK, right?  Well, my snail trail is spinning the wrong way.  When I jotted down the instructions for the block from Jess's tutorial at The Elven Garden, I didn't pay close attention to which way the trail was spinning.  I even drew a little picture -  spinning the wrong way.

Maybe it is a hemisphere thing?  I mean, when you flush a toilet in Australia, the water goes down and around counter-clockwise instead of clockwise like it does here in the Northern Hemisphere, right?  So does that mean that I really belong in Australia (or somewhere else in the Southern Hemisphere)?  Or is Jess in the wrong hemisphere?  Who knows!

So while Olivia is home with an earache, I will be unpicking these today and putting them together the right way.

So what have you been working on this week?

Link up your fabulous blocks.  You put a lot of hard work into them - show them off!  This free linky will stay open for a whole week.  And spread the word!


Quilter in the Closet

Rules:

1) Please link up only to the page in your blog showing your wonderful blocks, not just the blog homepage.  Flickr pictures are also OK.
2) Make sure to put your blog name as the description so people know where they are going or the name of your block!
3) Please grab my button and post it in your blog post or sidebar.
4) Visit other linky participants!


Thanks for reading,

Jen


Tuesday, January 29, 2013

String Quilt Block - Building Blocks Tuesday

Welcome We Bee Learning Bee bee-mates!  Building Blocks Tuesday is where I normally show off the blocks I've been making for the week.

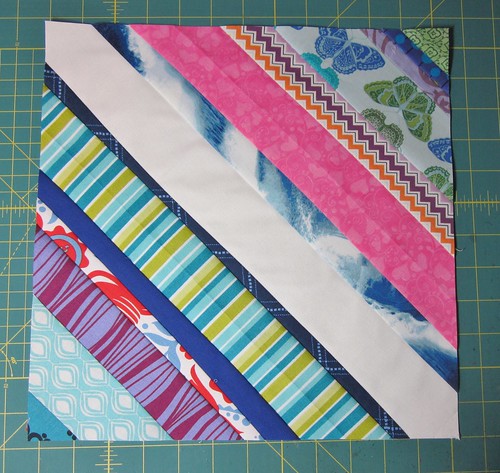
For my regular readers, I am participating in the We Bee Learning Bee, organized by Mrs. Pickles Garden.   February is my month and I need to do a tutorial for my fellow bee-mates to follow.  So, today for Building Blocks Tuesday, I am going to show you all (or y'all) how I built this string block.

string trimmed

This block is not original.  There are plenty of other tutorials out there like mine, including this one from Film in the Fridge, and this one at PS I Quilt, and another from the Sometimes Crafter.  There are probably dozens of tutorials out there for this block, but I had never tried a string block until this morning (the reason Building Blocks Tuesday is a little late today).

OK, here we go....

You will need:
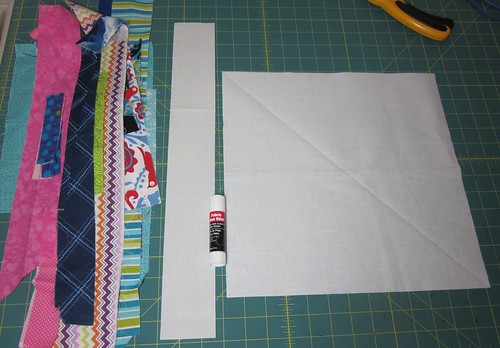
supplies for string
  • a 13 inch square of muslin**
  • one 18 1/2 inch strip of solid white (I used Kona PDF White)
  • various strips at least 1 1/4 inch wide to 2 1/2 wide, varying lengths.
  • fabric glue OR Elmer's Washable School Glue (the washable part is key!)

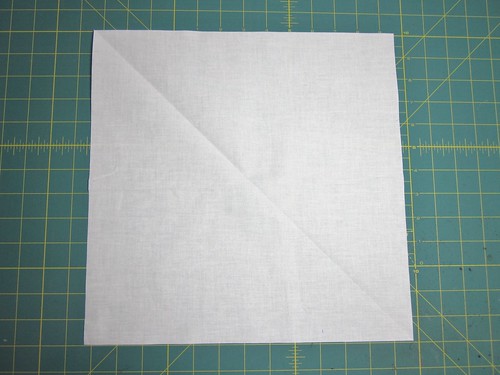
1) Take your muslin square, join a bottom corner diagonally to a top corner and finger press.  You could also use a temporary marking tool to draw a diagonal line here.  This is just a reference point, it is not essential.

muslin foundation


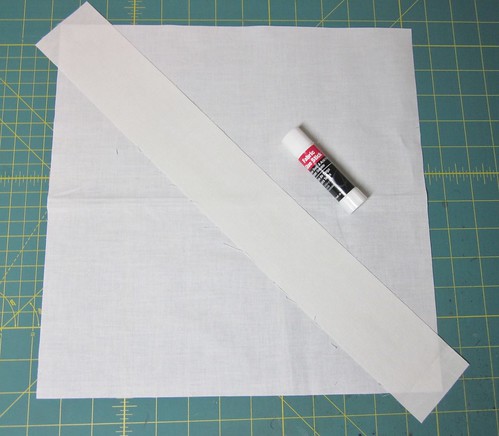
2) Apply a small amount of glue along this diagonal mark.  Only a little glue is needed, don't go crazy. (If the glue makes you nervous, you can use pins.)  Center your white strip of fabric along this diagonal line where you have put the glue.  If your white fabric has a "right side", make sure it is facing up.

center string

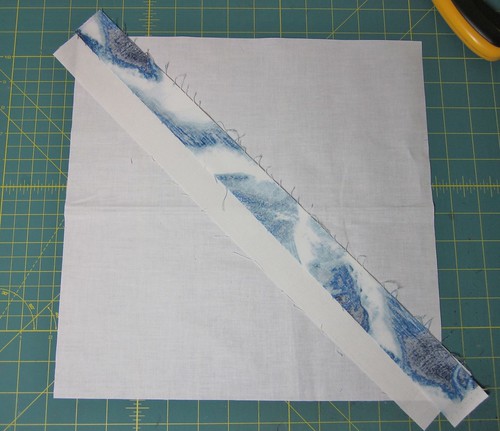
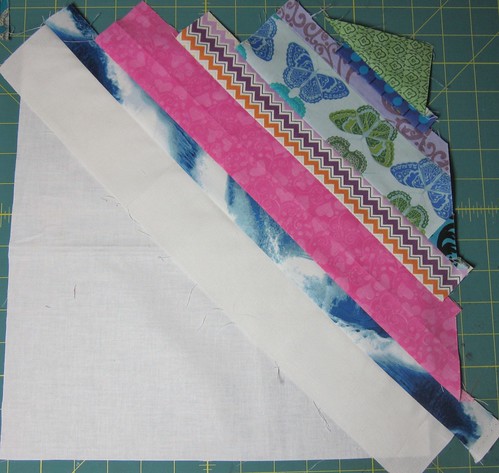
3) Take the first strip of fabric you want to use and lay it right side down on your white strip, lining up the raw edges.  Secure this strip by sewing a 1/4 inch seam.

first string

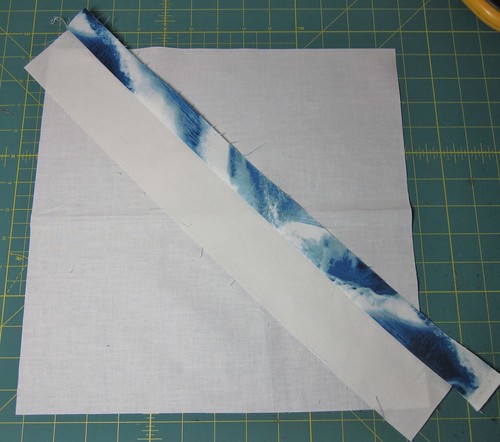
4) Press toward the fabric you just added.

first string pressed

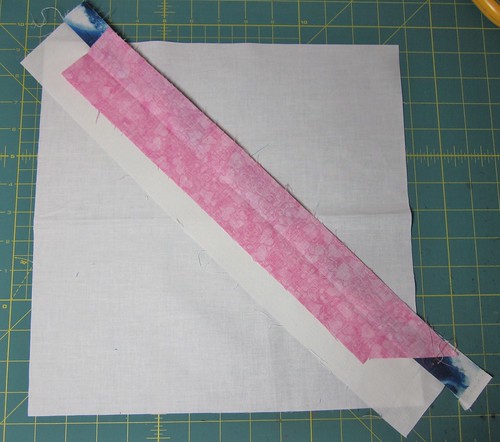
5) Take your next strip of fabric, lay it right side down on the fabric you just added, sew with a 1/4 inch seam, and press. 

second string

6) Repeat the process until you reach the end of this half of your muslin square.
half string

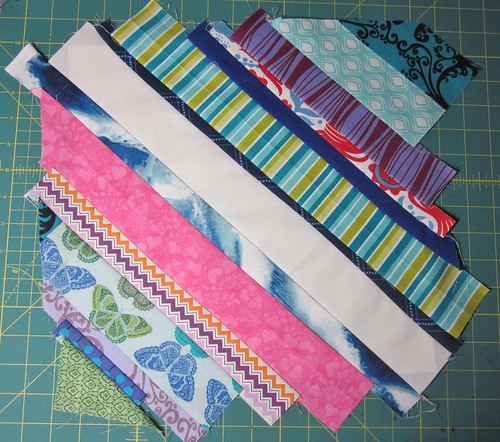
7) Turn the block and start adding strips of fabric to the other side of your white strip, using the same process,  until the whole square is filled.

string finished

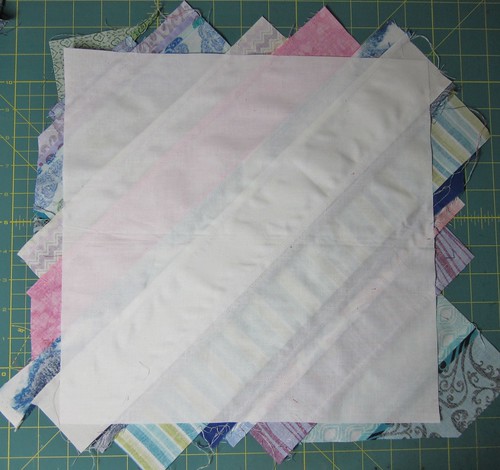
For those of you who are wondering, this is what the back looks like.

string back


8) Trim the block to 12 1/2 inches square.  I found it easiest if I did it from the back, that way I could make sure my diagonal stayed intact.

string trimmed

9) You are done!

I don't think that these blocks look like much on their own, but when you put them together.....
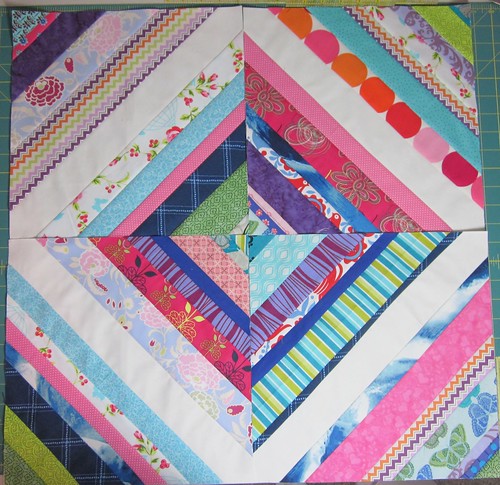
4 strings together

Nice, huh?

It is a very similar effect as the Depression blocks we made in January with the HST's.  Just different.

Here are some additional tips:
  • the muslin is optional, but you do need some kind of foundation.  You could use paper, but if you do, make sure it is very thin, like paper-piecing paper, or telephone book paper.  Because I wanted my blocks to be 12 1/2 squared, and I didn't have any paper that size, I used the muslin.  You can tape paper together, but it might leave a little residue on your needle when you sew through the tape.  You will also need to remove the paper at the end after you have trimmed your block to size.  I am LAZY and didn't want to deal with the mess.  I had a bunch of cheap muslin laying around....you get the idea.
  • OH!!  If you use paper, make sure you shorten your stitch length to 1.5 or 1.3 so the needle will perforate you paper as you go, otherwise it is much harder to remove the paper afterwards.
  • When laying your strips down, make sure they at least reach the edge of the muslin foundation.  I had you start with a 13 inch square, so there will be some trimming.  There is a little distortion though, so don't rely on that extra 1/2 inch.
  • Strip width - I found anything wider that 2 1/2 inches just looked like an enormous chunk of fabric in the block.  Likewise, anything smaller than 1 1/4 inch tended to be a little too thin and warped a little.
  • The ends of you strips do not need to be perfectly cut, but it is easier to sew a strip that has a consistent width.
  • Strips like it best when cut on the grain instead of on the bias.  Leftover binding tails are wonderful!
  • It seemed easier to use leftover triangle scraps in the corners instead of little thin strips.  So get out those HST leftovers or the triangles you cut off when joining binding, etc.
  • COLORS!!  My eyes tend to be drawn to cool colors, but I don't want to limit you.  So anything goes!
  • However, please choose colors and fabrics that you like, otherwise if you use a fabric that isn't your favorite -- it will stick out like a sore thumb!  I'll let you guess which fabric I used that I wish I hadn't!
I hope you enjoy the process like I did!  If you have any questions, please let me know!


So what have you been working on this week?

Link up your fabulous blocks.  You put a lot of hard work into them - show them off!  This free linky will stay open for a whole week.  And spread the word!


Quilter in the Closet

Rules:

1) Please link up only to the page in your blog showing your wonderful blocks, not just the blog homepage.  Flickr pictures are also OK.
2) Make sure to put your blog name as the description so people know where they are going or the name of your block!
3) Please grab my button and post it in your blog post or sidebar.
4) Visit other linky participants!


Thanks for reading,

Jen


Tuesday, January 8, 2013

First bee blocks - Building Blocks Tuesday

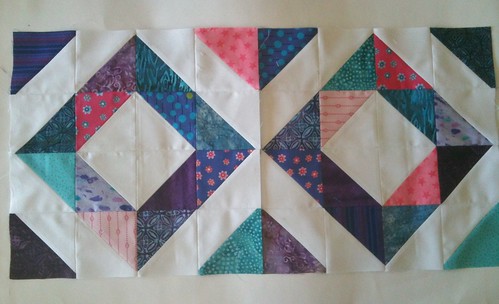
We Bee Learning Jan. block
horrible camera phone photo, colors aren't quite this dark in person
Here are my first blocks of the New Year!  The pattern is called the "Depression Block", and these are destined for Danielle of the We Bee Learning Bee.  As you can see, it is one of the many ways you can configure Half Square Triangles, a good first block for a learning bee (in my opinion).  Danielle wanted a mix of prints, batiks were OK, as long as everything was pink, purple, aqua or blue.  I had some Batiks in her colors, so I thought I would use them.  It is the first time I've really mixed Batiks with regular quilters cottons.  I'm not sure I like the combination, but that could just be because I've generally cooled on Batiks of late.  The important thing is that Danielle likes them!

So what have you been working on this week?


Link up your fabulous blocks.  You put a lot of hard work into them - show them off!  This linky will stay open for a whole week.


Quilter in the Closet

Rules:

1) Please link up only to the page in your blog showing your wonderful blocks, not just the blog homepage.  Flickr pictures are also OK.
2) Make sure to put your blog name as the description so people know where they are going or the name of your block!
3) Please grab my button and post it in your blog post or sidebar.
4) Visit other linky participants!

Thanks for reading today!

Jen