Not much sewing happened today as I was busy starting my spring cleaning. Ugh! But that is not what I want to write about today.
Why isn't there enough time to do everything you want to do? I know I am not alone in wondering this. Lately, I feel like I must be going in slow motion because when I take an inventory of what I have done at the end of the day, the list is never as long as I think it should be. Which brings me to my next question - should I take on fewer tasks or just lower my expectations about actually getting anything done? This question plagues me! Especially since it seems like each week there is something new and cool going on in Blogland. My list of "want to's" grows and grows! Yet, I know I cannot possibly do it all. Heck, I can't even seem to start and finish one UFO per month!
Tell me, how do you decide what to participate in?
Quilter in the Closet: My artistic journey as I learn, try, and am inspired by multiple techniques, including quilting, painting, drawing, and who knows what else!
This blog may contain affiliate links to products. As an affiliate, I earn a small amount from qualifying purchases; however, it does not affect the cost of the item to you, nor am I compensated if you do not purchase.
Tuesday, March 6, 2012


Monday, March 5, 2012
Itty Bitty Mini Mug Rug
It's super fun if you say it fast, "Itty Bitty Mini Mug Rug, Itty Bitty Mini Mug Rug.."

I was right in the middle of sewing my Name Game Swap Quilt when I saw there was a Modern Mini Challenge at Ellison Lane. I thought I might enter that quilt in the challenge, but I haven't heard word yet that my partner has received it (it had quite a way to go). So, I decided to finally make myself a mug rug using some of the same mini blocks, the spools of thread and the sewing machines. I added a half square triangle border and when all was said and done it is about 6.5 by 6.5 inches square! Just big enough for a cup of coffee.
Now, I know what you are thinking, why brown?? Well, I supposed I should have chosen some more modern colors, but I tend to frequently spill my coffee. Do you see where I am going with this? Plus, the UFO that I am supposed to be working on for March is all blues and browns. After all those bright colors in the Name Game quilt, I thought I would ease myself back into other colors.
If you want to make your own mini spools and sewing machines, click HERE for the patterns. More free stuff from me to you!

I was right in the middle of sewing my Name Game Swap Quilt when I saw there was a Modern Mini Challenge at Ellison Lane. I thought I might enter that quilt in the challenge, but I haven't heard word yet that my partner has received it (it had quite a way to go). So, I decided to finally make myself a mug rug using some of the same mini blocks, the spools of thread and the sewing machines. I added a half square triangle border and when all was said and done it is about 6.5 by 6.5 inches square! Just big enough for a cup of coffee.
Now, I know what you are thinking, why brown?? Well, I supposed I should have chosen some more modern colors, but I tend to frequently spill my coffee. Do you see where I am going with this? Plus, the UFO that I am supposed to be working on for March is all blues and browns. After all those bright colors in the Name Game quilt, I thought I would ease myself back into other colors.
If you want to make your own mini spools and sewing machines, click HERE for the patterns. More free stuff from me to you!
Friday, March 2, 2012
Desperate Housewives Block - Rollercoaster
Introducing my "Rollercoaster" Block, because sometimes life is like a rollercoaster. You've got ups, you've got downs, but it's one hell of a ride!

I feel like I had barely started this blog, when Jane of Want it, Need it, Quilt it asked me if I was interested in designing a block for her Desperate Housewives Quilt. "Sure", I said, "I'll give it a go!" Mind you, I never really designed a block before. And most of Jane's blocks thus far have a more modern feel to them. I have never even made a modern quilt before. Did that stop me? Absolutely not!
I actually started by brainstorming things that went with a "Desperate Housewives" theme - car pool, ballet class, potluck supper. Problem was that most of these design inspirations appeared in my head as somewhat complicated applique blocks, and I didn't want to make them.
Then I started looking around for modern designs to inspire me. My friend that has a flair for modern style gave me a tip, "Keep it simple". Sounded easy enough. This block all started with a modern style lamp hanging in our local sushi restaurant. It was wavy. I like wavy, I live at the beach! Sketching it was simple enough; but that was where the simplicity ended. And somehow, I was back at a housewife type of theme - simplicity isn't always simple.
Without getting too much into it, I think we can agree that sometimes the simplest "looking" things are often actually difficult. Marriage - hey, how hard can that be? All those people getting divorces aren't as smart or as in love as us, right? Kids - oh come on! Feed them, love them, occasionally wipe a nose or two. Isn't motherhood inherent? Souffle - enough said.
Sewing curves can be tricky and this block has not one, but two curves, going in opposite directions! Well, as I said before, not having a clue what I am doing hasn't stopped me in the past, why should it now? I made a sample block using the only way I know how to sew curves, by pinning it to death. There had to be an easier way. Paper piecing - DID NOT work. I did not have time to try the freezer paper method. So I went back to pinning, and got some decent results.
Here are the directions:
Step 1: Print out the template. Cut to size. Click Here for template. Solid lines are cut lines, dotted are sew lines.
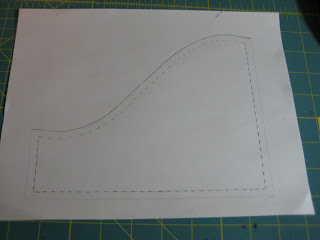
Step 2: Cut a 8.5 inch by 6.5 inch rectangle of fabric one, and another 8.5 inch by 6.5 inch rectangle of fabric two, and using your favorite marking took, mark the curve (the cut line) on the backside of each fabric using the template. TIP: If you are going to make more than one block, cut your rectangle 8.5 inches by 9 inches and nestle the templates.

Step 3: cut each fabric on the solid cut lines (the dotted lines are the sew lines, remember):

Step 4: At this point I found it helpful to overlap the fabrics by approximately 1/8 inch and mark small hash lines to aid with lining up the curves later when pinning.


Step 5: Starting with the straight side edges, start pinning right sides together. Work from the outside edges in. Ease in the fabric around the curvy parts. Why outside edges in? Because the middle of the block has more of a bias edge, thus more stretchiness. It will be easier to sew the middle because of this stretchiness than the curves near the edges of the block.


Step 6: When you think you have a few pins, add a few more! TIP: I find that the fabric near the curves wants to bend between my fingers a bit when pinning, go with it! I get fewer puckers. Do not try to make your fabric lie straight. Pin as liberally as you like! The fabric might be puckered in places, but as long as it is NOT puckered where the 1/4 inch seam is going to be sewn, you will be OK. It will look something like this mess.
Step 7: Start sewing with a 1/4 inch seam.

Step 8: Press seams toward the dark, and you are done!

Step 9: Decide how to finish??
Step 10: Add blocks together if you choose. I wanted to show you what they might look like together - kind of a wavy modern zigzag. I started making this table runner for Easter, using a 4 inch version of the block. But, with my deadline for posting upon me, haven't finished yet. Hint: I did use the mirror image of the template to get the waves to meet up.
More tips:
If for some reason you have trouble downloading the template, email me and I will be happy to send you the PDF that way. I am new to this, remember!
I'll also be saving this post on a new page called "Free stuff from me to you"
Enjoy!

I feel like I had barely started this blog, when Jane of Want it, Need it, Quilt it asked me if I was interested in designing a block for her Desperate Housewives Quilt. "Sure", I said, "I'll give it a go!" Mind you, I never really designed a block before. And most of Jane's blocks thus far have a more modern feel to them. I have never even made a modern quilt before. Did that stop me? Absolutely not!
I actually started by brainstorming things that went with a "Desperate Housewives" theme - car pool, ballet class, potluck supper. Problem was that most of these design inspirations appeared in my head as somewhat complicated applique blocks, and I didn't want to make them.
Then I started looking around for modern designs to inspire me. My friend that has a flair for modern style gave me a tip, "Keep it simple". Sounded easy enough. This block all started with a modern style lamp hanging in our local sushi restaurant. It was wavy. I like wavy, I live at the beach! Sketching it was simple enough; but that was where the simplicity ended. And somehow, I was back at a housewife type of theme - simplicity isn't always simple.
Without getting too much into it, I think we can agree that sometimes the simplest "looking" things are often actually difficult. Marriage - hey, how hard can that be? All those people getting divorces aren't as smart or as in love as us, right? Kids - oh come on! Feed them, love them, occasionally wipe a nose or two. Isn't motherhood inherent? Souffle - enough said.
Sewing curves can be tricky and this block has not one, but two curves, going in opposite directions! Well, as I said before, not having a clue what I am doing hasn't stopped me in the past, why should it now? I made a sample block using the only way I know how to sew curves, by pinning it to death. There had to be an easier way. Paper piecing - DID NOT work. I did not have time to try the freezer paper method. So I went back to pinning, and got some decent results.
Here are the directions:
Step 1: Print out the template. Cut to size. Click Here for template. Solid lines are cut lines, dotted are sew lines.

Step 2: Cut a 8.5 inch by 6.5 inch rectangle of fabric one, and another 8.5 inch by 6.5 inch rectangle of fabric two, and using your favorite marking took, mark the curve (the cut line) on the backside of each fabric using the template. TIP: If you are going to make more than one block, cut your rectangle 8.5 inches by 9 inches and nestle the templates.

Step 3: cut each fabric on the solid cut lines (the dotted lines are the sew lines, remember):

Step 4: At this point I found it helpful to overlap the fabrics by approximately 1/8 inch and mark small hash lines to aid with lining up the curves later when pinning.


Step 5: Starting with the straight side edges, start pinning right sides together. Work from the outside edges in. Ease in the fabric around the curvy parts. Why outside edges in? Because the middle of the block has more of a bias edge, thus more stretchiness. It will be easier to sew the middle because of this stretchiness than the curves near the edges of the block.


Step 6: When you think you have a few pins, add a few more! TIP: I find that the fabric near the curves wants to bend between my fingers a bit when pinning, go with it! I get fewer puckers. Do not try to make your fabric lie straight. Pin as liberally as you like! The fabric might be puckered in places, but as long as it is NOT puckered where the 1/4 inch seam is going to be sewn, you will be OK. It will look something like this mess.
 |
| got enough pins? Sometimes you don't need this many. |
Step 7: Start sewing with a 1/4 inch seam.

Step 8: Press seams toward the dark, and you are done!

Step 9: Decide how to finish??
 |
| Rollercoaster anyone? |
 |
| Perhaps riding a wave? |
Step 10: Add blocks together if you choose. I wanted to show you what they might look like together - kind of a wavy modern zigzag. I started making this table runner for Easter, using a 4 inch version of the block. But, with my deadline for posting upon me, haven't finished yet. Hint: I did use the mirror image of the template to get the waves to meet up.
 |
| Tookie, inspecting the progress |
More tips:
- The bigger block was easier than the smaller one, probably because there was less curve to try to stretch into the fabric.
- I found that if I gently pulled the fabric against the pull of the sewing machine, it helped me ease any puckers I didn't pin properly.
- Press the block before you decide to rip out any seams. Unless it is a dart with two stitches or more, frequently the iron will smooth out any wrinkles near the seam. Also, depending on which direction your seam is pressed, the seam itself will absorb a small amount of fullness too.
If for some reason you have trouble downloading the template, email me and I will be happy to send you the PDF that way. I am new to this, remember!
I'll also be saving this post on a new page called "Free stuff from me to you"
Enjoy!
Subscribe to:
Posts (Atom)